
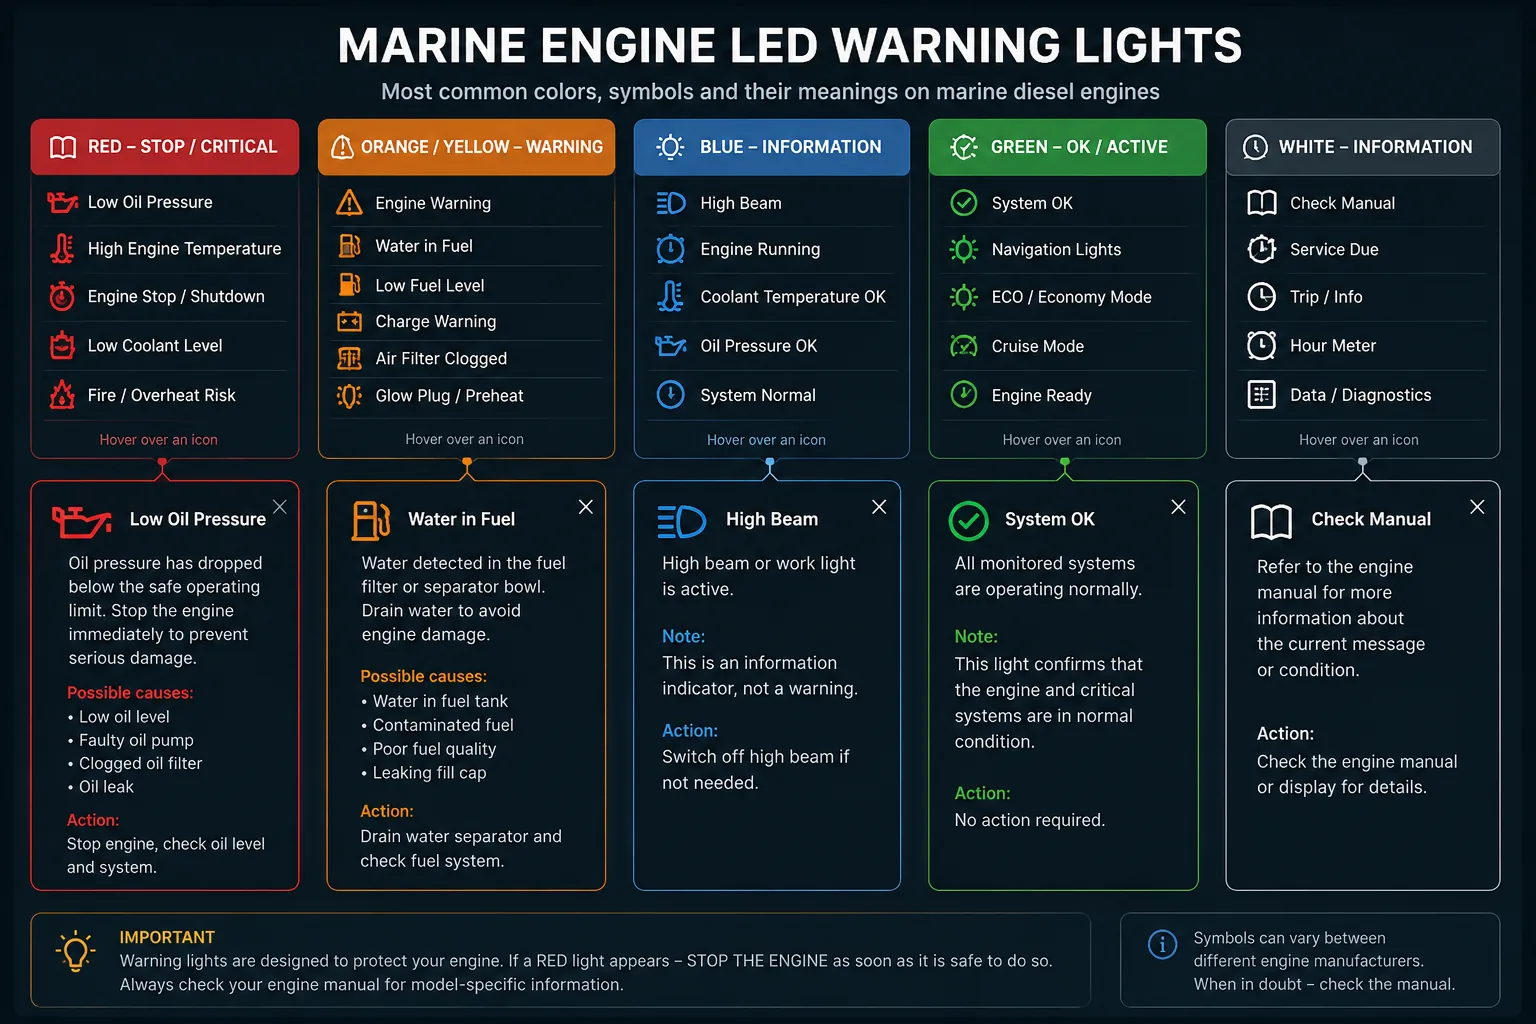
Common Sailboat Diesel Engine Faults: Symptoms, Diagnosis and Repair
A practical guide to the most common diesel-engine problems found on sailing yachts. Each fault includes visible symptoms, likely causes, a structured confirmation procedure, repair steps, tools, professional diagnostic equipment, typical parts, estimated repair time and clear stop-running warnings.
Interactive symptom finder
Enter one or more observations, such as white smoke, no exhaust water, clicking, low power or oil alarm. The tool searches this guide and ranks matching fault sections.
Fast triage: what should you check first?
| Symptom | First safe check | Do not continue when |
|---|---|---|
| Oil-pressure alarm | Stop and verify oil level, then confirm pressure with a mechanical gauge. | Mechanical pressure is below the engine specification. |
| Overtemperature alarm | Stop, verify exhaust-water flow and allow the engine to cool. | Cooling water is absent, coolant is lost or steam is present. |
| No water at exhaust | Stop immediately; check seacock, strainer and impeller. | Flow is not fully restored. |
| Fuel leak | Stop, isolate ignition sources, ventilate and identify the exact leak. | Any active leak remains. |
| Sudden vibration | Reduce RPM, select neutral when safe and inspect shaft/propeller/mounts. | Coupling, shaft seal or mount is loose or damaged. |
| White smoke with locked engine | Do not crank; check for water or coolant in a cylinder. | Hydro-lock is possible. |
1. Engine Does Not Crank
Symptoms
- The starter does not rotate the engine.
- A single click or repeated clicking is heard when the start button is pressed.
- The instrument panel becomes dim or resets during the start attempt.
- The starter operates intermittently or only after several attempts.
Most likely causes
- Discharged or damaged starting battery.
- Loose, corroded or overheated battery terminals and ground connections.
- Faulty battery isolator, main fuse, starter relay or start switch.
- Defective starter solenoid or starter motor.
- Engine mechanically seized or hydro-locked.
How to confirm the fault
- Place the gearbox in neutral, close the raw-water seacock if prolonged cranking is expected, and disable accidental engine starting before touching starter wiring.
- Measure battery open-circuit voltage. A fully charged 12 V lead-acid battery is normally around 12.6–12.8 V at rest; voltage alone does not prove battery capacity.
- Measure battery voltage directly across the battery posts while an assistant presses START. A large voltage collapse indicates a weak battery, excessive current draw or a locked engine.
- Perform voltage-drop tests during cranking: battery positive post to starter B+ terminal, and battery negative post to the starter housing. Excessive drop identifies resistance in cables, switches or connections.
- Verify that the starter solenoid receives the manufacturer-specified control voltage when START is pressed.
- If the solenoid receives correct control voltage but the starter does not turn, test starter current draw and bench-test the starter.
- Before condemning the starter, rotate the crankshaft manually using the correct crankshaft pulley fastener and manufacturer procedure. If the engine will not rotate, stop and investigate seizure or liquid in a cylinder.
Repair procedure
- Switch off the battery isolator and remove the negative battery cable first.
- Clean battery posts, cable lugs and engine ground points to bright metal. Replace cracked, green, heat-damaged or stiff cables.
- Refit connections, protect them with a suitable terminal protectant and tighten to the battery or engine manufacturer’s specification.
- Charge and load-test the battery. Replace it if it fails the test.
- Replace a failed main fuse, relay, start switch or isolator only after finding the reason for overheating or excessive resistance.
- For starter removal, label and photograph cables, isolate the battery, support the starter, disconnect wiring, remove mounting bolts and install the replacement with the correct alignment and torque.
- After repair, open the raw-water seacock, start the engine and verify reliable cranking, charging voltage and that no cable or terminal becomes hot.
Basic tools
- Digital multimeter
- Socket and spanner set
- Battery terminal brush
- Torque wrench
- Insulated screwdrivers
- Flashlight
Professional diagnostic equipment
- Battery conductance/load tester
- DC clamp ammeter with inrush capability
- Starter/charging system analyzer
- Milliohm meter
- Starter bench tester
2. Engine Cranks but Will Not Start
Symptoms
- The starter rotates the engine at normal speed, but combustion does not begin.
- There may be no exhaust smoke, or white smoke may appear while cranking.
- The engine briefly fires and then stops.
- Starting becomes difficult after fuel-filter replacement or after the tank has run low.
Most likely causes
- Fuel shut-off control remains engaged.
- Air is trapped in the low- or high-pressure fuel circuit.
- Primary or secondary fuel filter is blocked.
- Fuel tank vent, pickup pipe, shut-off valve or lift pump is restricted.
- Insufficient cranking speed, failed preheating system or low compression.
- Contaminated fuel or injector/injection-pump fault.
How to confirm the fault
- Confirm there is clean fuel in the tank and that the fuel shut-off valve is open.
- Check that the mechanical stop lever or electrical stop solenoid returns fully to RUN.
- Inspect the transparent water-separator bowl or drain a fuel sample into a clear container. Allow it to settle and look for water, microbial sludge or debris.
- Replace visibly contaminated filters, then follow the engine manufacturer’s exact bleeding sequence. Do not loosen common-rail high-pressure pipes.
- Observe exhaust during cranking: no smoke usually suggests that fuel is not reaching the cylinders; white vapour suggests fuel is injected but not igniting correctly.
- Measure cranking speed where diagnostic data is available. Low starter speed can prevent compression ignition even when the starter appears to turn.
- Test glow plugs, intake heater or preheat relay only if the engine model uses them.
- Measure supply pressure or restriction on the low-pressure side. If fuel delivery and cranking speed are correct, carry out a compression test and professional injector testing.
Repair procedure
- Correct the stop-control position and repair a sticking cable or failed stop solenoid.
- Drain water from the separator and replace primary and secondary filters with the correct micron rating.
- Fill filters only if the engine manufacturer permits pre-filling, using exceptionally clean fuel and equipment.
- Open the specified bleed screws, operate the manual lift pump or electric priming pump and bleed each stage until bubble-free fuel appears.
- Close bleed screws without overtightening, clean all spilled fuel and start the engine according to the manual.
- Repair cracked suction hoses, loose fittings, blocked tank vent or defective lift pump if air repeatedly returns.
- Have injectors, injection pump and compression professionally tested when the fuel supply is proven and the engine still does not start.
Basic tools
- Correct fuel-filter wrench
- Spanner set
- Clear drain container
- Absorbent pads
- Bleeding hose
- Digital multimeter
- Remote starter switch only where permitted
Professional diagnostic equipment
- Low-pressure fuel gauge
- Fuel-system vacuum/restriction gauge
- Diesel compression tester with correct adapter
- Injector pop tester for mechanical injectors
- Common-rail diagnostic interface
- Oscilloscope/current probe
3. Engine Starts and Then Stops
Symptoms
- The engine starts normally but stops after seconds or minutes.
- It runs at idle but stalls when power is applied.
- Performance temporarily returns after the filter is changed or the fuel-cap is loosened.
- The priming bulb, if fitted, collapses or suction-side hoses draw air.
Most likely causes
- Blocked tank vent or fuel pickup.
- Clogged primary/secondary filter.
- Air leak on the suction side.
- Water or microbial contamination in the tank.
- Weak lift pump.
- Stop solenoid losing electrical supply.
How to confirm the fault
- Run the engine only when safely secured and with cooling water available.
- Temporarily loosen the fuel filler cap. If the engine continues running, inspect and clear the tank vent.
- Connect a vacuum/restriction gauge before the lift pump or filter according to the engine’s fuel-system layout. Rising restriction before the stall identifies a supply blockage.
- Inspect the separator bowl and collect fuel samples from the tank bottom and filter drain.
- Use a short transparent test hose only where safe and permitted to identify bubbles on the suction side.
- Measure lift-pump pressure and delivery volume against the service specification.
- Monitor voltage at the stop solenoid while the fault occurs.
Repair procedure
- Clear or replace the tank-vent hose and ensure its outlet cannot ingest seawater.
- Replace clogged filters and clean the separator housing.
- Replace cracked hoses, sealing washers and damaged O-rings. Use marine fuel hose of the correct standard.
- Remove and clean a blocked pickup pipe. Do not leave loose debris in the tank.
- Pump out heavily contaminated fuel, clean the tank and refill with verified clean diesel.
- Replace a weak lift pump or repair its electrical supply.
- Bleed the system and test under progressively increasing load while monitoring for leaks.
Basic tools
- Filter wrench
- Spanners
- Clear sampling jars
- Absorbent pads
- Fuel-rated hose clamps
- Multimeter
Professional diagnostic equipment
- Vacuum/restriction gauge
- Low-pressure fuel gauge
- Fuel-polishing equipment
- Borescope for tank inspection
- Fuel contamination test kit
4. No Cooling Water at the Exhaust
Symptoms
- Little or no water exits with the exhaust.
- The exhaust hose or mixing elbow becomes abnormally hot.
- Steam appears at the transom.
- The temperature alarm may sound shortly after startup.
Most likely causes
- Closed seacock or blocked intake.
- Blocked seawater strainer.
- Damaged raw-water-pump impeller.
- Loose pump cover, worn pump cam or air leak before the pump.
- Collapsed or delaminated hose.
- Blocked heat exchanger, anti-siphon valve or exhaust mixing elbow.
How to confirm the fault
- Stop the engine immediately. Do not wait for the temperature alarm.
- Confirm the seacock handle position and inspect the strainer with the seacock closed.
- Reopen the seacock briefly with the strainer lid removed only if the installation allows this safely; verify intake flow, then close it again.
- Remove the raw-water-pump cover and inspect every impeller blade. Account for all missing fragments.
- Inspect the cover plate and pump cam for scoring or wear.
- Check suction hoses for soft sections, internal delamination and loose clamps.
- Progressively inspect downstream components, including oil cooler, heat exchanger, anti-siphon valve and mixing elbow, for trapped impeller fragments or scale.
- After repair, use a flow test or compare exhaust-water output with the engine manufacturer’s specification.
Repair procedure
- Close the seacock and clean the intake strainer.
- Remove the impeller using the correct puller. Never lever aggressively against a soft pump housing.
- Recover missing blade fragments from downstream coolers and pipework.
- Lubricate the replacement impeller with the manufacturer-approved lubricant, align it correctly and install a new gasket or O-ring.
- Inspect and, if needed, reverse or replace a worn cover plate when the pump design permits.
- Replace collapsed hoses and double-clamp connections below the waterline where required.
- Clean restricted coolers or replace a severely blocked mixing elbow.
- Open the seacock, start the engine and immediately confirm strong exhaust-water flow and leak-free operation.
Basic tools
- Screwdrivers
- Socket/spanner set
- Impeller puller
- Needle-nose pliers
- Inspection mirror
- Flashlight
- Hose-pinch pliers
Professional diagnostic equipment
- Raw-water flow meter
- Borescope
- Vacuum gauge
- Pump pressure gauge
- Thermal camera
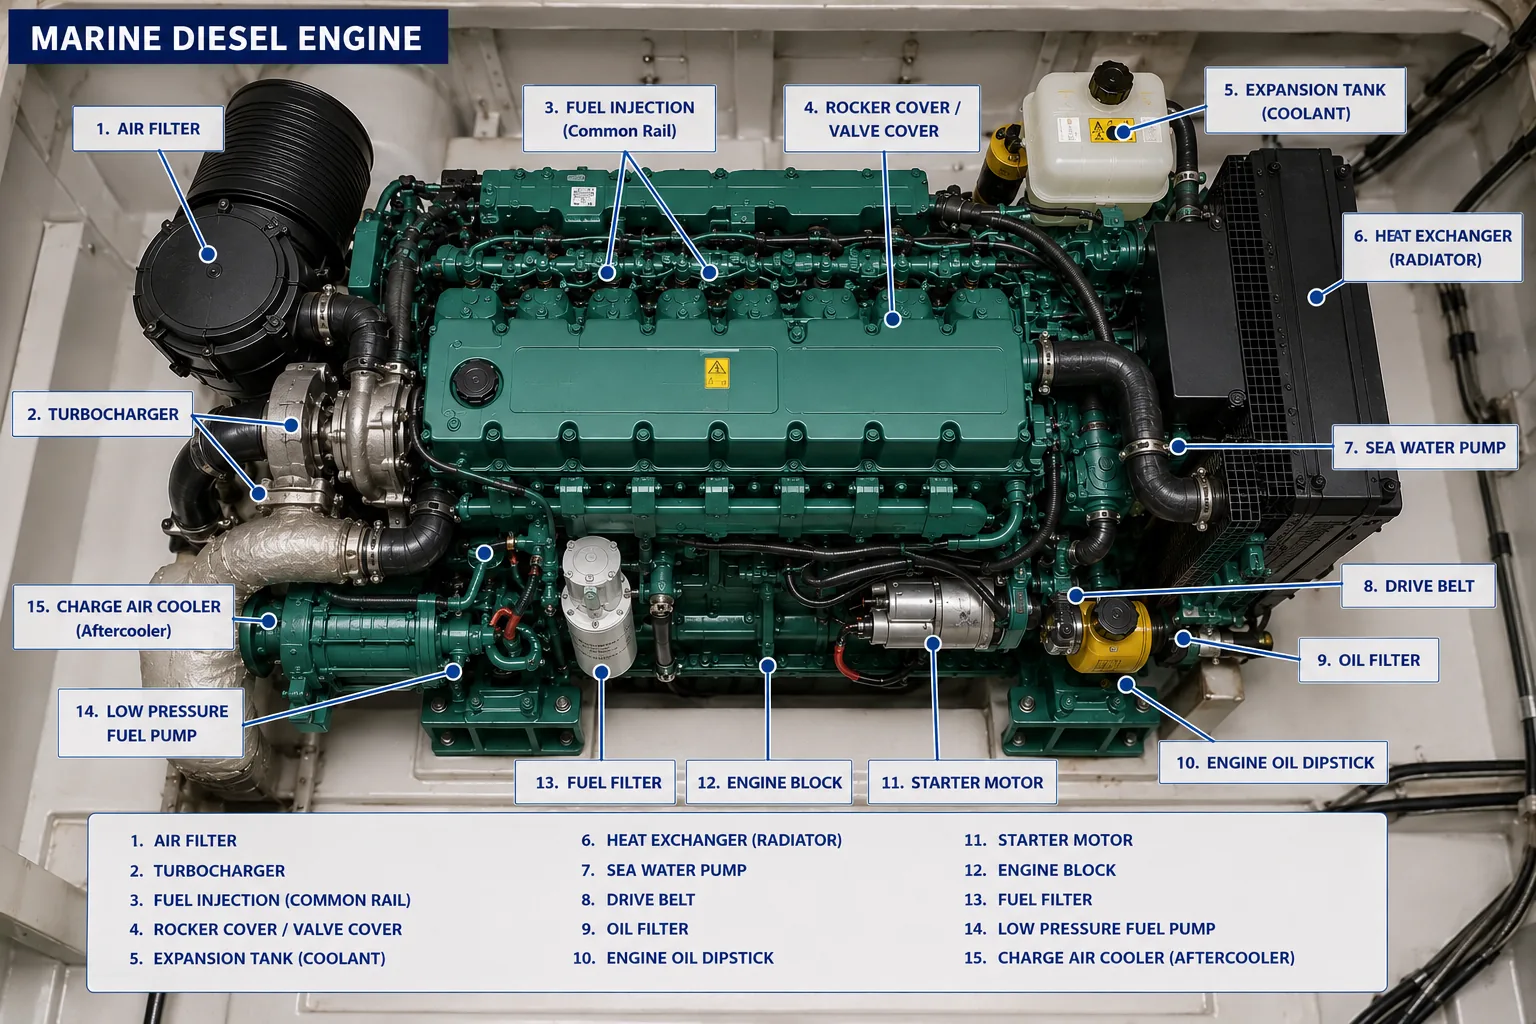
5. Engine Overheats
Symptoms
- Temperature gauge rises above the normal stabilized value.
- High-temperature alarm sounds.
- Coolant is expelled into the overflow bottle or bilge.
- Steam, hot coolant smell or reduced power is present.
- The problem occurs only at high load or high RPM.
Most likely causes
- Insufficient raw-water flow.
- Low coolant level, trapped air or coolant leak.
- Loose or slipping circulation-pump belt.
- Thermostat stuck closed.
- Restricted heat exchanger or exhaust elbow.
- Faulty circulation pump.
- Incorrect propeller load, dirty hull or internal engine fault.
How to confirm the fault
- Reduce load and stop the engine as soon as it is safe. Never remove a pressurized coolant cap while hot.
- Confirm raw-water flow and inspect the impeller circuit first.
- After full cooldown, verify coolant level and inspect hoses, cap, heat exchanger, pump weep hole and engine for dried coolant traces.
- Pressure-test the closed cooling system to the cap or manufacturer-specified pressure. A pressure loss identifies an external or internal leak.
- Compare thermostat housing, cylinder head and heat-exchanger temperatures using a contact thermometer or thermal camera.
- Remove and bench-test the thermostat in controlled heated water, measuring its opening temperature and travel against specification.
- Measure belt tension with a gauge and inspect for glazing, dust or pulley misalignment.
- Check engine RPM under load. An over-pitched or fouled propeller can overload the engine and increase temperature.
- If coolant disappears without an external leak, test for combustion gases in the coolant and perform compression/leak-down tests.
Repair procedure
- Restore raw-water flow before addressing the closed circuit.
- Replace leaking hoses, clamps, cap, seals or water pump as identified by the pressure test.
- Replace the thermostat with the correct temperature rating and new seal.
- Remove, clean and pressure-test the heat exchanger; replace sacrificial anodes and O-rings.
- Set or replace the circulation-pump/alternator belt using the specified tension.
- Refill with the manufacturer-approved coolant mixture and bleed air at all specified bleed points.
- Run at idle, then at increasing load while monitoring temperatures at multiple points.
- If combustion gas, low compression or coolant in a cylinder is confirmed, remove the cylinder head for specialist inspection and repair.
Basic tools
- Infrared or contact thermometer
- Socket set
- Torque wrench
- Belt-tension gauge
- Coolant drain pan
- Hose-clamp tools
Professional diagnostic equipment
- Cooling-system pressure tester
- Thermal camera
- Combustion-gas block tester
- Compression tester
- Cylinder leak-down tester
- Heat-exchanger pressure-test rig
6. Black Exhaust Smoke
Symptoms
- Black or dark-grey smoke increases with throttle.
- The engine cannot reach rated full-load RPM.
- Soot accumulates around the exhaust outlet.
- Fuel consumption rises and acceleration is poor.
Most likely causes
- Propeller or hull fouling.
- Over-pitched, damaged or incorrectly sized propeller.
- Restricted intake air.
- Blocked exhaust mixing elbow.
- Injector fault or incorrect injection timing.
- Turbocharger air-path fault on turbocharged engines.
- Engine overloaded by drivetrain or auxiliary equipment.
How to confirm the fault
- Record no-load and loaded maximum RPM and compare with the engine/gearbox specification.
- Inspect hull, propeller and shaft for fouling or damage.
- Inspect the air filter, intake silencer and hose for restriction.
- Measure exhaust backpressure at the manufacturer-specified test point.
- Inspect the mixing elbow internally after removal.
- For turbocharged engines, inspect compressor rotation, hose leaks and boost pressure.
- Perform injector balance/cut-out testing only with approved diagnostic equipment; bench-test injectors when indicated.
- Verify valve clearance and compression if air, exhaust and propeller load are correct.
Repair procedure
- Clean the hull and propeller and repair damaged blades.
- Correct propeller diameter or pitch through a qualified propeller specialist.
- Replace a blocked air filter and damaged intake hoses.
- Clean or replace a carbon-restricted mixing elbow.
- Repair boost leaks and service or replace a failed turbocharger.
- Have injectors professionally cleaned, calibrated or replaced.
- Correct valve clearance and injection timing according to the engine manual.
Basic tools
- Tachometer or verified panel RPM
- Inspection light
- Socket set
- Air-filter tools
- Scraper/brush for removed parts
Professional diagnostic equipment
- Exhaust backpressure gauge
- Boost-pressure gauge
- Injector tester/bench
- Compression tester
- Borescope
- Marine dynamometer or controlled load test
7. White Smoke or White Vapour
Symptoms
- White smoke appears during cold starting or persists when warm.
- The engine misfires, runs roughly or smells of unburned diesel.
- Coolant level may fall without a visible leak.
- Dense steam may increase as the engine warms.
Most likely causes
- Low cylinder temperature during cold start.
- Failed glow plug or intake heater where fitted.
- Poor injector spray pattern or retarded injection.
- Low compression.
- Air in the fuel system.
- Coolant or raw water entering a cylinder.
- Normal water vapour being mistaken for smoke.
How to confirm the fault
- Determine whether the plume disperses rapidly like steam or lingers and smells of diesel.
- Check whether the symptom disappears after normal warm-up.
- Test glow-plug resistance and current draw against specification.
- Inspect for bubbles or air ingress in the low-pressure fuel circuit.
- Carry out cylinder contribution testing with approved equipment.
- Perform compression or leak-down testing when one cylinder is suspected.
- Pressure-test the cooling system and inspect cylinders with a borescope after the engine has stood.
- Check engine oil for rising level or milky contamination and coolant for combustion gases.
Repair procedure
- Repair the preheat circuit or replace defective glow plugs using correct removal torque and anti-seize only if approved.
- Eliminate fuel air leaks and bleed the system.
- Service or replace faulty injectors after bench confirmation.
- Adjust valve clearance and verify injection timing.
- For confirmed low compression, repair valves, rings or cylinder surfaces as required.
- For confirmed coolant entry, remove the cylinder head, pressure-test it, check flatness and repair the gasket/head/block fault.
- Investigate raw-water backflow, anti-siphon failure or incorrect exhaust geometry if water ingress is suspected.
Basic tools
- Multimeter
- Clamp ammeter
- Spanner/socket set
- Cooling pressure tester
- Clear fuel-sampling container
Professional diagnostic equipment
- Compression tester
- Leak-down tester
- Borescope
- Injector test bench
- Combustion-gas tester
- Cylinder-head pressure-test equipment
8. Blue Smoke and High Oil Consumption
Symptoms
- Blue-grey smoke persists after warm-up.
- Engine oil level falls between checks.
- Oily residue appears at the exhaust.
- Crankcase pressure or oil mist is excessive.
Most likely causes
- Oil level too high or incorrect oil grade.
- Blocked crankcase breather.
- Worn valve guides or stem seals.
- Worn/stuck piston rings or cylinder wear.
- Turbocharger oil-seal failure.
- Extended low-load operation causing cylinder glazing.
How to confirm the fault
- Verify oil level using the correct cold/warm procedure and confirm the dipstick is correct for the installation angle.
- Confirm oil viscosity and specification from service records.
- Inspect and test the crankcase ventilation system.
- Measure crankcase pressure/blow-by under controlled load.
- Inspect turbocharger compressor and turbine sides for oil where fitted.
- Perform dry and wet compression tests or a leak-down test.
- Use a borescope to inspect cylinder walls and piston crowns.
- Record oil consumption over measured engine hours; do not rely on visual estimates.
Repair procedure
- Correct the oil level and replace incorrect or fuel-diluted oil and filter.
- Clean or replace the crankcase breather.
- Repair turbocharger oil supply/drain faults and overhaul the turbo only after confirmation.
- Replace valve-stem seals or repair guides if leakage is identified.
- For ring or cylinder wear, remove and overhaul the engine with measured bore, piston and ring clearances.
- After repair, follow the manufacturer’s break-in and loading procedure.
Basic tools
- Oil extraction/drain equipment
- Oil-filter wrench
- Torque wrench
- Inspection lamp
- Measuring container
Professional diagnostic equipment
- Compression and leak-down testers
- Crankcase pressure manometer
- Borescope
- Turbo inspection equipment
- Oil analysis laboratory
9. Low Oil Pressure Alarm
Symptoms
- Oil-pressure warning remains on after starting or appears when hot.
- Gauge pressure is lower than the normal baseline.
- Tapping, knocking or bearing noise may be present.
- Pressure is normal cold but very low at hot idle.
Most likely causes
- Low oil level or wrong oil viscosity.
- Faulty pressure switch, sender, gauge or wiring.
- Blocked oil pickup or damaged suction seal.
- Worn oil pump or stuck pressure-relief valve.
- Excessive bearing clearance.
- Fuel or coolant dilution of engine oil.
How to confirm the fault
- Stop the engine immediately when the alarm sounds.
- Check oil level and inspect for leakage or dilution.
- Install a calibrated mechanical oil-pressure gauge at the specified test port.
- Compare cold-idle, hot-idle and specified-RPM pressure with the workshop manual.
- Test the electrical sender and wiring separately.
- Inspect the used oil filter media and oil sample for metal, fuel or coolant.
- If mechanical pressure is low, inspect pickup, pump and relief valve, then measure bearing clearances during teardown.
Repair procedure
- Correct oil level and replace diluted or incorrect oil and filter.
- Repair the electrical warning circuit when mechanical pressure is proven correct.
- Clean or replace the pickup and its seal.
- Overhaul or replace the oil pump and pressure-relief components.
- Repair worn crankshaft journals and bearings using measured clearances and the workshop specification.
- Flush contaminated lubrication passages only by an approved engine-overhaul procedure.
Basic tools
- Dipstick and clean wipes
- Oil drain/extraction equipment
- Filter cutter
- Socket set
- Torque wrench
Professional diagnostic equipment
- Calibrated mechanical oil-pressure gauge
- Oil analysis
- Micrometers
- Plastigage where approved
- Bearing-clearance gauges
10. Engine Loses Power or Cannot Reach Rated RPM
Symptoms
- The engine revs normally in neutral but not under load.
- Boat speed is lower than usual at the same RPM.
- RPM falls as throttle is increased.
- Smoke colour may be black, white or absent depending on the cause.
Most likely causes
- Fuel restriction or air ingress.
- Propeller/hull fouling or drivetrain drag.
- Blocked intake or exhaust.
- Injector, compression or valve-clearance issue.
- Incorrect throttle-cable travel.
- Gearbox or shaft-line fault.
How to confirm the fault
- Verify that the throttle lever reaches the full-fuel stop at the engine.
- Record no-load and loaded RPM, smoke colour, speed and temperatures.
- Measure fuel restriction and supply pressure under load.
- Inspect propeller, hull, shaft and rope cutter.
- Measure exhaust backpressure and inspect the mixing elbow.
- Check gearbox oil condition and shaft rotation with the engine safely disabled.
- Perform compression, valve-clearance and injector tests if external systems pass.
- Compare the installed propeller and gearbox ratio with engine specifications.
Repair procedure
- Restore fuel flow and eliminate air leaks.
- Clean the hull and propeller and remove wrapped line.
- Adjust throttle cable to achieve full travel without overloading the lever.
- Clean or replace restricted intake/exhaust components.
- Service injectors, set valve clearances and correct internal faults based on test results.
- Repair gearbox, cutless bearing, alignment or shaft problems as confirmed.
- Conduct a sea trial at specified full-load RPM while monitoring temperature, pressure and smoke.
Basic tools
- Tachometer
- Fuel-filter tools
- Inspection lamp
- Basic hand tools
- Feeler gauges for approved valve adjustment
Professional diagnostic equipment
- Fuel vacuum/pressure gauges
- Exhaust backpressure gauge
- Compression tester
- Injector bench
- Shaft-alignment tools
- Propeller calculation data
11. Excessive Vibration or Drivetrain Noise
Symptoms
- Vibration increases at a particular RPM.
- The engine moves excessively on its mounts.
- Knocking, rumbling or cyclic noise is heard in gear.
- The shaft seal leaks or the coupling becomes hot.
Most likely causes
- Damaged or fouled propeller.
- Bent shaft or worn cutless bearing.
- Engine/shaft misalignment.
- Collapsed engine mount.
- Loose coupling bolts.
- Cylinder misfire or uneven compression.
How to confirm the fault
- Determine whether vibration occurs in neutral, in gear, or only while moving.
- Inspect mounts for collapsed rubber, oil contamination, cracked brackets and loose fasteners.
- Check coupling bolts and witness marks.
- Measure coupling-face alignment with feeler gauges or dial indicator after the boat has rested afloat.
- Measure shaft runout and inspect the cutless-bearing clearance.
- Inspect the propeller underwater or after haul-out.
- If vibration is present in neutral, perform cylinder contribution, injector and compression tests.
Repair procedure
- Remove rope or marine growth and repair/balance the propeller.
- Replace worn cutless bearing or bent shaft.
- Replace engine mounts as a matched set when required and set engine height.
- Align the engine to the shaft within the gearbox/coupling manufacturer’s tolerance.
- Torque coupling and mount fasteners and recheck after a sea trial.
- Repair a confirmed engine misfire separately.
Basic tools
- Socket/spanner set
- Torque wrench
- Feeler gauges
- Inspection mirror
- Straightedge
Professional diagnostic equipment
- Dial indicator and magnetic base
- Laser shaft-alignment tool
- Vibration analyzer
- Propeller balancing equipment
- Shaft runout fixtures
12. Alternator Does Not Charge the Batteries
Symptoms
- Battery warning light remains on.
- Voltage does not rise after the engine starts.
- Charging is intermittent or drops when loads are applied.
- The belt squeals or alternator cables become hot.
Most likely causes
- Loose, worn or contaminated drive belt.
- Open fuse, poor ground or high-resistance cable connection.
- Failed alternator regulator, brushes, diodes or windings.
- Missing excitation signal.
- Battery isolator, splitter or external regulator fault.
- Battery defect causing abnormal charge behaviour.
How to confirm the fault
- Measure voltage directly at the alternator B+ and alternator case, then at the battery posts.
- Measure charging current with a DC clamp meter under a known electrical load.
- Perform positive and negative voltage-drop tests while charging.
- Inspect belt tension, pulley alignment and belt dust.
- Check field/excitation voltage and regulator connections according to the alternator design.
- Use an oscilloscope or alternator analyzer to identify excessive AC ripple from failed diodes.
- Load-test batteries separately before condemning the alternator.
Repair procedure
- Isolate batteries and correct loose or corroded high-current connections.
- Replace and tension the belt, then recheck after initial running.
- Replace failed fuses or damaged cables with correctly rated marine cable and protection.
- Repair regulator/excitation wiring or replace the regulator.
- Remove and bench-test the alternator; overhaul or replace it when internal failure is proven.
- After repair, verify voltage, current, temperature and voltage drop at idle and cruising RPM.
Basic tools
- Digital multimeter
- DC clamp meter
- Socket/spanner set
- Belt-tension gauge
- Torque wrench
Professional diagnostic equipment
- Oscilloscope
- Alternator analyzer
- Battery load tester
- Insulation tester where appropriate
- Alternator bench tester
13. Diesel Fuel Leak
Symptoms
- Diesel smell in the engine compartment.
- Wetness around filters, pumps, injectors or return hoses.
- Fuel appears in the bilge.
- The engine draws air and becomes difficult to start.
Most likely causes
- Loose fitting or damaged sealing washer.
- Incorrectly installed filter seal.
- Cracked return hose or aged fuel line.
- Leaking lift pump or injection-pump seal.
- Injector leak-off or high-pressure pipe fault.
- Corroded tank or damaged pickup fitting.
How to confirm the fault
- Stop the engine, ventilate and absorb spilled fuel.
- Clean the entire system and use dry tissue or approved leak-detection powder to identify the source.
- Pressurize only the low-pressure circuit to the manufacturer-approved test pressure.
- Inspect filters, banjo washers, hose ends, lift pump and tank fittings.
- For high-pressure systems, use remote inspection methods; never use fingers to find a leak.
- Pressure-test a suspect tank after removal or isolation using a safe low-pressure method.
Repair procedure
- Replace damaged hose with approved marine diesel hose and correct clamps.
- Replace copper washers, O-rings and filter seals; never reuse a deformed sealing washer where replacement is specified.
- Refit high-pressure pipes without bending them and torque unions to the engine specification.
- Replace a leaking pump, injector return assembly or tank fitting.
- Clean the bilge and dispose of contaminated absorbents legally.
- Bleed the system, run the engine and inspect again under load.
Basic tools
- Spanners including flare-nut types
- Absorbent pads
- Inspection lamp
- Mirror
- Torque wrench
- Fuel-rated hose cutter
Professional diagnostic equipment
- Low-pressure test pump/gauge
- UV dye approved for diesel where applicable
- Remote camera
- Injector return-flow kit
- Tank pressure-test equipment
14. Coolant Leak or Unexplained Coolant Loss
Symptoms
- Coolant level falls between checks.
- Coloured deposits or wetness appear around hoses, pump or heat exchanger.
- Coolant is expelled into the overflow bottle.
- Sweet smell, white vapour or milky oil may be present.
Most likely causes
- Loose clamp, cracked hose or failed pressure cap.
- Heat-exchanger end-cap or O-ring leak.
- Circulation-pump seal failure.
- Leaking calorifier/water-heater circuit.
- Cylinder-head gasket or cracked head/block.
- Incorrect expansion-tank plumbing or trapped air.
How to confirm the fault
- Allow the engine to cool completely.
- Pressure-test the system and inspect every joint, the pump weep hole, heat exchanger and calorifier loop.
- Test the pressure cap separately.
- Add approved UV tracer only if compatible with the coolant and manufacturer guidance.
- Check oil and coolant for cross-contamination.
- Use a combustion-gas test at the expansion tank.
- Perform compression/leak-down testing and borescope inspection when an internal leak is suspected.
Repair procedure
- Replace leaking hoses, clamps, cap, O-rings or pump.
- Clean heat-exchanger sealing faces and install new end-cap seals.
- Isolate and repair the calorifier circuit if leaking.
- Refill with correct premixed coolant and bleed the system.
- For confirmed head-gasket failure, remove the head, measure flatness, pressure-test it and reassemble with new bolts where specified.
- Verify pressure retention and stable temperature during a full-load sea trial.
Basic tools
- Cooling pressure tester
- Hose-clamp tools
- Socket set
- Torque wrench
- Drain pan
- Refractometer or coolant tester
Professional diagnostic equipment
- Cap tester
- UV inspection kit
- Combustion-gas tester
- Compression/leak-down testers
- Cylinder-head straightedge and machine-shop testing
15. Blocked or Corroded Exhaust Mixing Elbow
Symptoms
- Progressive loss of power and black smoke.
- Reduced cooling-water discharge.
- Exhaust note changes and the elbow runs hot.
- Rust staining, water leakage or soot appears around the elbow.
Most likely causes
- Carbon and salt buildup reducing the internal passage.
- Internal corrosion between gas and water passages.
- Incorrect engine loading or prolonged low-load operation.
- Age-related failure of cast-iron or stainless components.
How to confirm the fault
- Measure exhaust backpressure at the specified test point under load.
- Compare raw-water flow before and after the elbow if the system allows.
- Remove the elbow after cooling and isolating raw water.
- Inspect both gas and water passages with a borescope and measure remaining open area.
- Pressure-test the water jacket separately where practical.
- Inspect the exhaust hose for heat damage and delamination.
Repair procedure
- Close the seacock, drain the section and remove the exhaust hose without damaging it.
- Remove the elbow and discard severely corroded units.
- Clean reusable parts mechanically and chemically only by a process compatible with the material.
- Install a new gasket and elbow, using approved sealant only where specified.
- Replace heat-damaged exhaust hose and clamps.
- Open the seacock, start the engine and verify water flow, temperature and backpressure.
Basic tools
- Socket/spanner set
- Penetrating oil
- Hose-removal tools
- Scrapers/brushes
- Torque wrench
- Inspection light
Professional diagnostic equipment
- Exhaust backpressure gauge
- Borescope
- Pressure-test plugs/pump
- Wall-thickness measurement equipment
16. Water or Microbial Contamination in Diesel Fuel
Symptoms
- Water or dark sludge appears in the separator bowl.
- Filters block repeatedly.
- The engine loses power, runs roughly or stops in waves.
- Corrosion appears in fuel-system components.
Most likely causes
- Water entering through deck filler or vent.
- Condensation and long-term storage.
- Contaminated fuel delivery.
- Microbial growth at the fuel/water interface.
- Tank corrosion or degraded hoses.
How to confirm the fault
- Take samples from the separator, tank bottom and fuel supply into clear labelled containers.
- Allow samples to settle and identify water, sediment and biological material.
- Use a professional microbial test kit where contamination is suspected.
- Inspect filler-cap O-ring, vent routing and tank inspection port.
- Cut open removed filters and inspect the media.
- Inspect the tank internally with a borescope where access allows.
Repair procedure
- Do not simply add biocide to a heavily contaminated tank and continue operating.
- Pump out free water and contaminated fuel using suitable equipment.
- Mechanically clean accessible tank surfaces or arrange professional tank cleaning.
- Polish salvageable fuel through staged water-separation and filtration only when appropriate.
- Replace all filters and clean the separator housing.
- Repair filler seals, vent faults and corroded components.
- Treat remaining fuel only with a product approved for the engine and local regulations, then monitor filters closely.
Basic tools
- Clear sample jars
- Filter wrench
- Absorbent pads
- Hand transfer pump rated for diesel
- Inspection lamp
Professional diagnostic equipment
- Fuel-polishing system
- Water-detection paste
- Microbial test kit
- Borescope
- Tank-cleaning equipment
- Particle-count/water-content laboratory testing
Diagnostic workflow that avoids replacing good parts
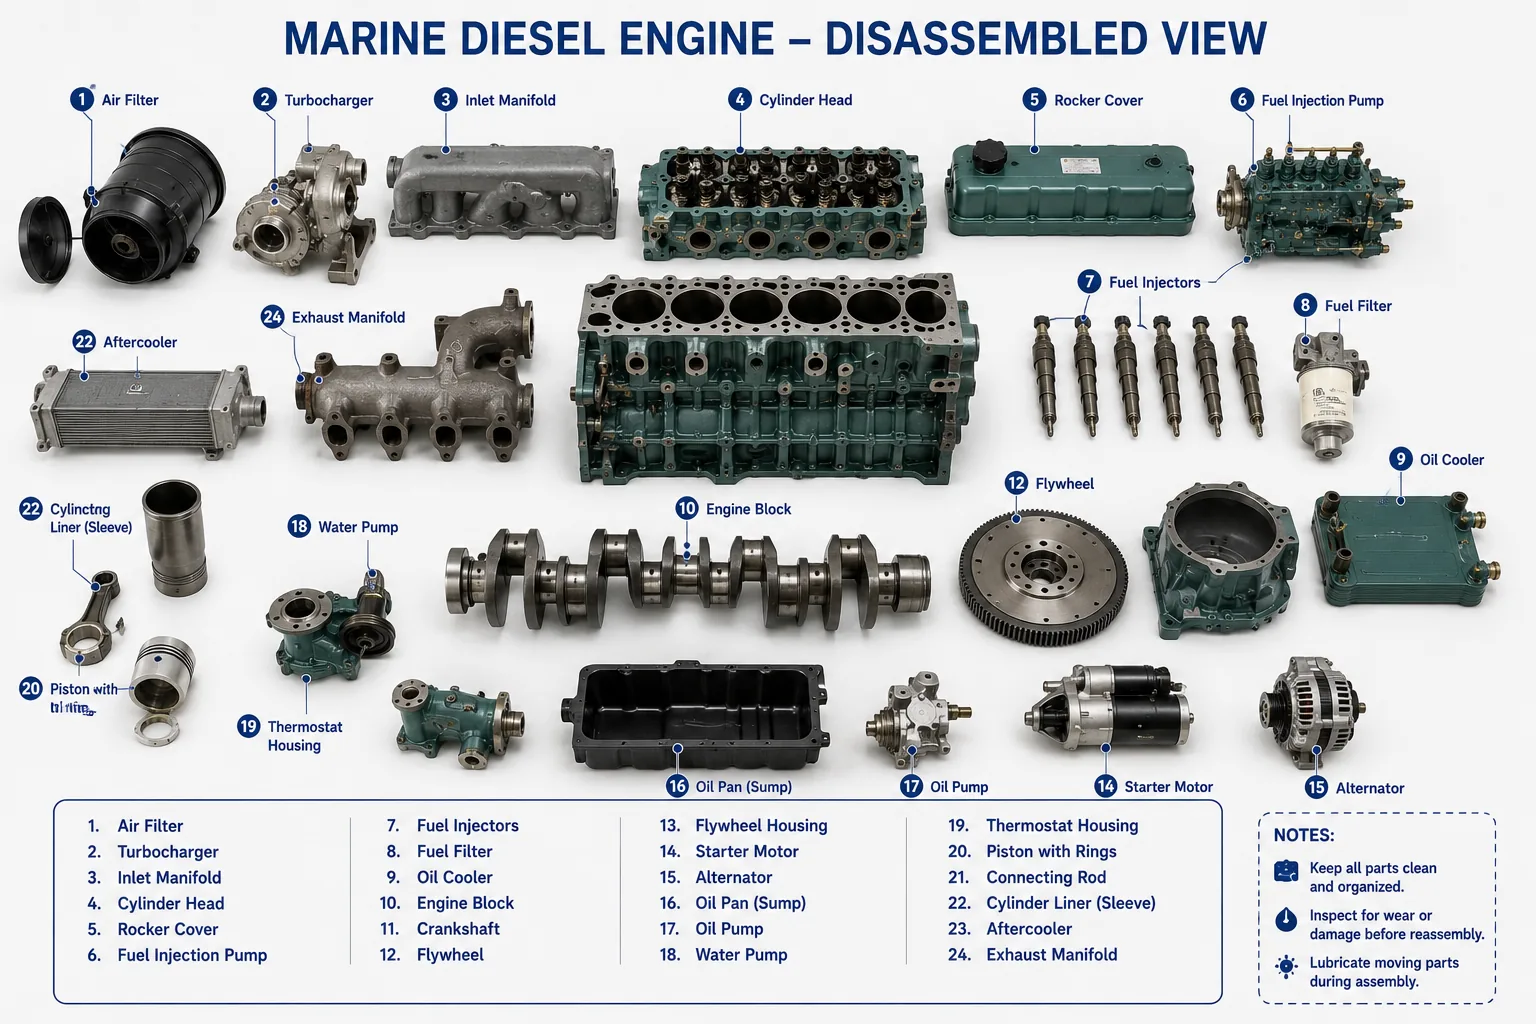
- Record the baseline: engine model, hours, recent work, fuel level, oil/coolant levels, alarm state, RPM, smoke colour and operating conditions.
- Reproduce only when safe: determine whether the fault occurs cold, hot, at idle, in gear or under full load.
- Start with non-invasive checks: visual inspection, fluid samples, voltage, temperature and restriction measurements.
- Test the complete system: for example, a new impeller does not prove that the heat exchanger or mixing elbow is clear.
- Compare with exact specifications: use the workshop manual for the precise engine model and serial-number range.
- Confirm after repair: repeat the failed operating condition, check leaks, temperatures, pressure, voltage, vibration and loaded RPM.
- Document the repair: record readings, parts, engine hours, photos and the next inspection date.
Recommended onboard diesel-engine tool kit
Essential onboard tools
- Metric socket and combination-spanner sets suitable for the installed engine.
- Torque wrench covering small fasteners and a second range for larger mounts/couplings.
- Digital multimeter and DC clamp meter.
- Impeller puller, filter wrenches and fuel-bleeding hose.
- Infrared thermometer, inspection mirror, strong headlamp and magnetic pickup.
- Hose-clamp tools, fuel-rated hose cutter, crimping tool and spare marine terminals.
- Absorbent pads, drain containers, nitrile gloves and fire extinguisher.
Useful spares
- Correct raw-water impeller, gasket and pump-cover screws.
- Primary and secondary fuel filters with seals.
- Oil filter, correct engine oil and coolant.
- Alternator/circulation-pump belts.
- Fuel and raw-water hose, approved clamps, copper washers and O-rings.
- Fuses, relays, terminals and a labelled wiring diagram.
Turn engine faults into controlled maintenance work
For charter fleets, marinas and service teams, every diagnosis should become a traceable work order with engine hours, symptoms, measurements, photographs, parts, labour and signatures. TwoBoat helps teams schedule preventive maintenance, manage spare parts and follow repairs from the first report to completion.
Explore Fleet Maintenance Software · Explore Work Order Management · Explore Marina Management Software
Frequently asked questions
Can a symptom identify a diesel-engine fault with complete certainty?
No. The same symptom can be caused by several systems. A reliable diagnosis requires measurements, comparison with the exact workshop specification and a successful post-repair test.
What are the most common causes of sailboat diesel breakdowns?
Fuel restriction or contamination, air in the fuel circuit, raw-water cooling failures, damaged impellers, blocked mixing elbows, weak batteries, poor cable connections and missed preventive maintenance are common causes.
Which alarms require an immediate shutdown?
Low oil pressure, loss of cooling-water discharge, severe overheating, active fuel leakage, sudden heavy vibration and suspected water in a cylinder require an immediate or prompt safe shutdown.
Should spare impeller blades be found after an impeller fails?
Yes. Missing fragments can lodge in coolers, hoses or the heat exchanger and continue restricting flow after a new impeller is fitted.
Why must loaded RPM be checked?
An engine that cannot reach its specified full-load RPM may be overloaded by propeller pitch, fouling, drivetrain drag, restricted air/exhaust or a fuel/combustion problem.
Continue reading
Build your Croatia sailing knowledge with related TwoBoat guides, software, guides and planning tools.