
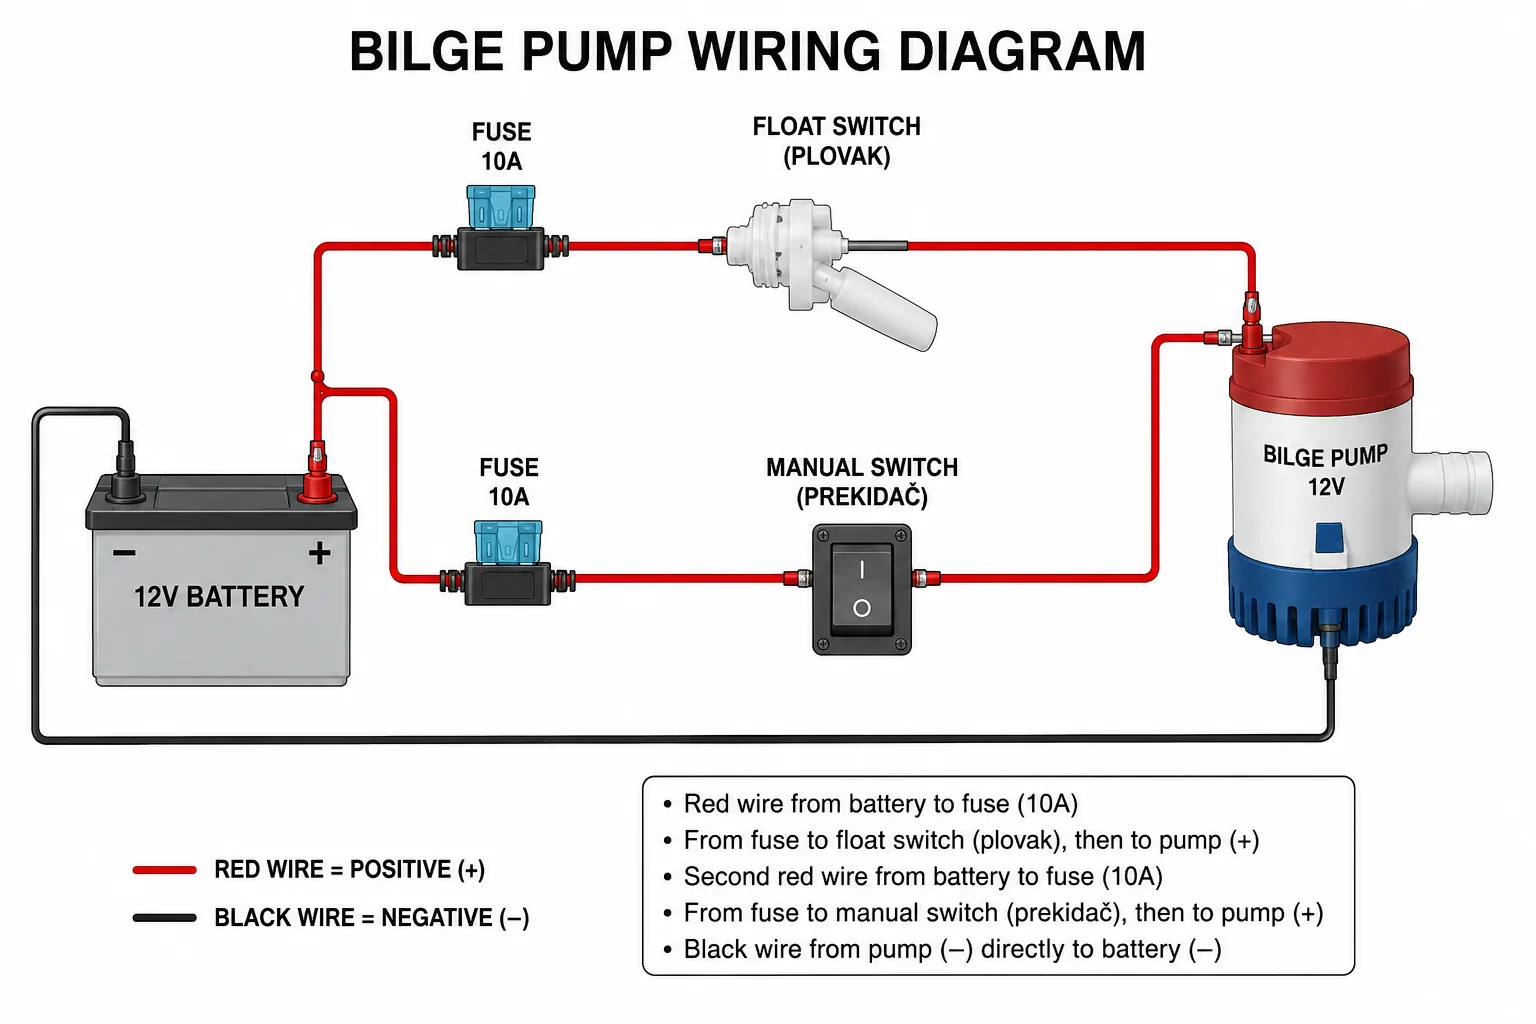
How to Connect a 12V Bilge Pump
A properly wired bilge pump is one of the most important safety systems on any boat. Whether you are replacing an old pump or installing a new automatic system, correct wiring ensures reliable operation when the boat starts taking on water.
Tools Required
- 12V Bilge Pump
- Automatic Float Switch (optional)
- Marine-grade wire
- Inline fuse holder
- Appropriate fuse
- Heat-shrink crimp connectors
- Wire stripper
- Multimeter
- Cable ties
Recommended Wire Size
| Pump Current | Wire Size | Fuse |
|---|---|---|
| Up to 5 A | 16 AWG (1.5 mm²) | 5 A |
| 5–10 A | 14 AWG (2.5 mm²) | 10 A |
| 10–15 A | 12 AWG (4 mm²) | 15 A |
Basic Wiring
- Disconnect the battery.
- Install the bilge pump in the lowest part of the bilge.
- Connect the negative wire directly to the battery negative bus.
- Run the positive wire through an inline fuse located close to the battery.
- Connect the fused positive wire to the bilge switch or automatic float switch.
- Reconnect the battery.
- Test manual operation.
- Test automatic operation by lifting the float switch.
Automatic Float Switch
An automatic float switch allows the pump to start whenever the water level rises. Most installations include:
- Battery positive
- Fuse
- Float switch
- Bilge pump
- Battery negative
Many boats also include a three-position panel switch:
- OFF
- AUTO
- MANUAL
Interactive 12V Bilge Pump Wiring Diagram
This interactive diagram shows how power flows from the battery, through the fuse and switch, to the bilge pump. Use the selector to compare OFF, AUTO and MANUAL mode.
Safety Tips
- Always use marine-grade tinned copper wire.
- Protect every positive circuit with a fuse.
- Keep electrical connections above normal bilge water level.
- Seal all crimp connectors with adhesive heat-shrink tubing.
- Support wiring every 30–40 cm.
Common Problems
Pump does not run
- Blown fuse
- Flat battery
- Bad ground connection
- Faulty switch
Pump runs continuously
- Stuck float switch
- Incorrect wiring
- Water trapped around the float
Weak water flow
- Blocked intake
- Kinked discharge hose
- Air leak
- Worn impeller
Important Things to Check Before Replacing a Bilge Pump
Replacing a bilge pump is not always as simple as installing a new unit. Before purchasing a replacement, compare the specifications of the existing pump and verify that the new installation is suitable for your boat's electrical system and plumbing. A few minutes of planning can prevent electrical problems, poor pumping performance or even hull damage.
1. Match the Pump Capacity
Check the flow rate of the existing pump before replacing it. Bilge pumps are typically rated in gallons per hour (GPH) or litres per hour (LPH). Installing a pump with significantly lower capacity may reduce your boat's ability to remove water during an emergency, while installing a much larger pump may overload the electrical circuit if the wiring and fuse are not upgraded.
| Typical Pump Size | Approx. Flow Rate | Typical Current Draw |
|---|---|---|
| 500 GPH | 1,900 L/h | 2–3 A |
| 800 GPH | 3,000 L/h | 3–5 A |
| 1100 GPH | 4,200 L/h | 4–7 A |
| 1500 GPH | 5,700 L/h | 7–10 A |
| 2000 GPH | 7,600 L/h | 10–15 A |
2. Verify the Hose Connection
Always check the outlet hose diameter before buying a replacement pump. The discharge outlet on the new pump should match the existing hose size whenever possible. Reducing the hose diameter can significantly reduce pumping performance, while increasing the size may require replacing the entire discharge hose.
- Verify hose inside diameter.
- Inspect the hose for cracks or kinks.
- Replace corroded hose clamps.
- Ensure the discharge loop remains above the waterline where required.
3. Install the Pump at the Lowest Practical Point
A bilge pump removes water only from the location where it is installed. Mount the pump at the lowest practical point of the bilge so it can remove as much water as possible without interfering with moving parts or preventing drainage from other compartments.
4. Check the Mounting Holes Carefully
Different manufacturers often use different mounting hole patterns. Before drilling new holes, compare the mounting base of the new pump with the existing installation.
- Reuse existing mounting holes whenever possible.
- Never drill into the hull without confirming the material thickness.
- Be especially careful on fiberglass boats.
- Avoid drilling through the hull or into structural components.
- If necessary, use an adapter plate instead of creating additional holes.
5. Upgrade the Wiring if Necessary
A higher-capacity bilge pump usually draws more current. If you install a larger pump, verify that the existing wiring is suitable for the increased load.
- Use only marine-grade tinned copper wire.
- Select the correct wire gauge for the pump current.
- Install the correct fuse size recommended by the manufacturer.
- Never replace a fuse with a larger one unless the wiring has also been upgraded.
6. Make Reliable Electrical Connections
Poor electrical connections are among the most common causes of bilge pump failure.
- Use marine crimp terminals with adhesive heat-shrink tubing.
- Use a proper ratcheting crimping tool.
- Do not twist wires together.
- Avoid household electrical connectors.
- Support cables using cable ties every 30–40 cm.
- Keep all connections above the normal bilge water level.
7. Check the Float Switch Movement
Before completing the installation, manually move the float switch through its full range of motion.
- Ensure the float moves freely.
- Check that hoses or wiring cannot obstruct the float.
- Verify that debris cannot become trapped underneath.
- Test automatic activation several times.
8. Perform a Complete Functional Test
After installation, test the system before leaving the dock.
- Check manual operation.
- Test automatic operation using the float switch.
- Verify water is discharged overboard.
- Inspect every electrical connection.
- Confirm the fuse does not overheat.
- Check for vibration or excessive noise.
- Inspect the discharge hose for leaks.
Replacement Checklist
Maintenance
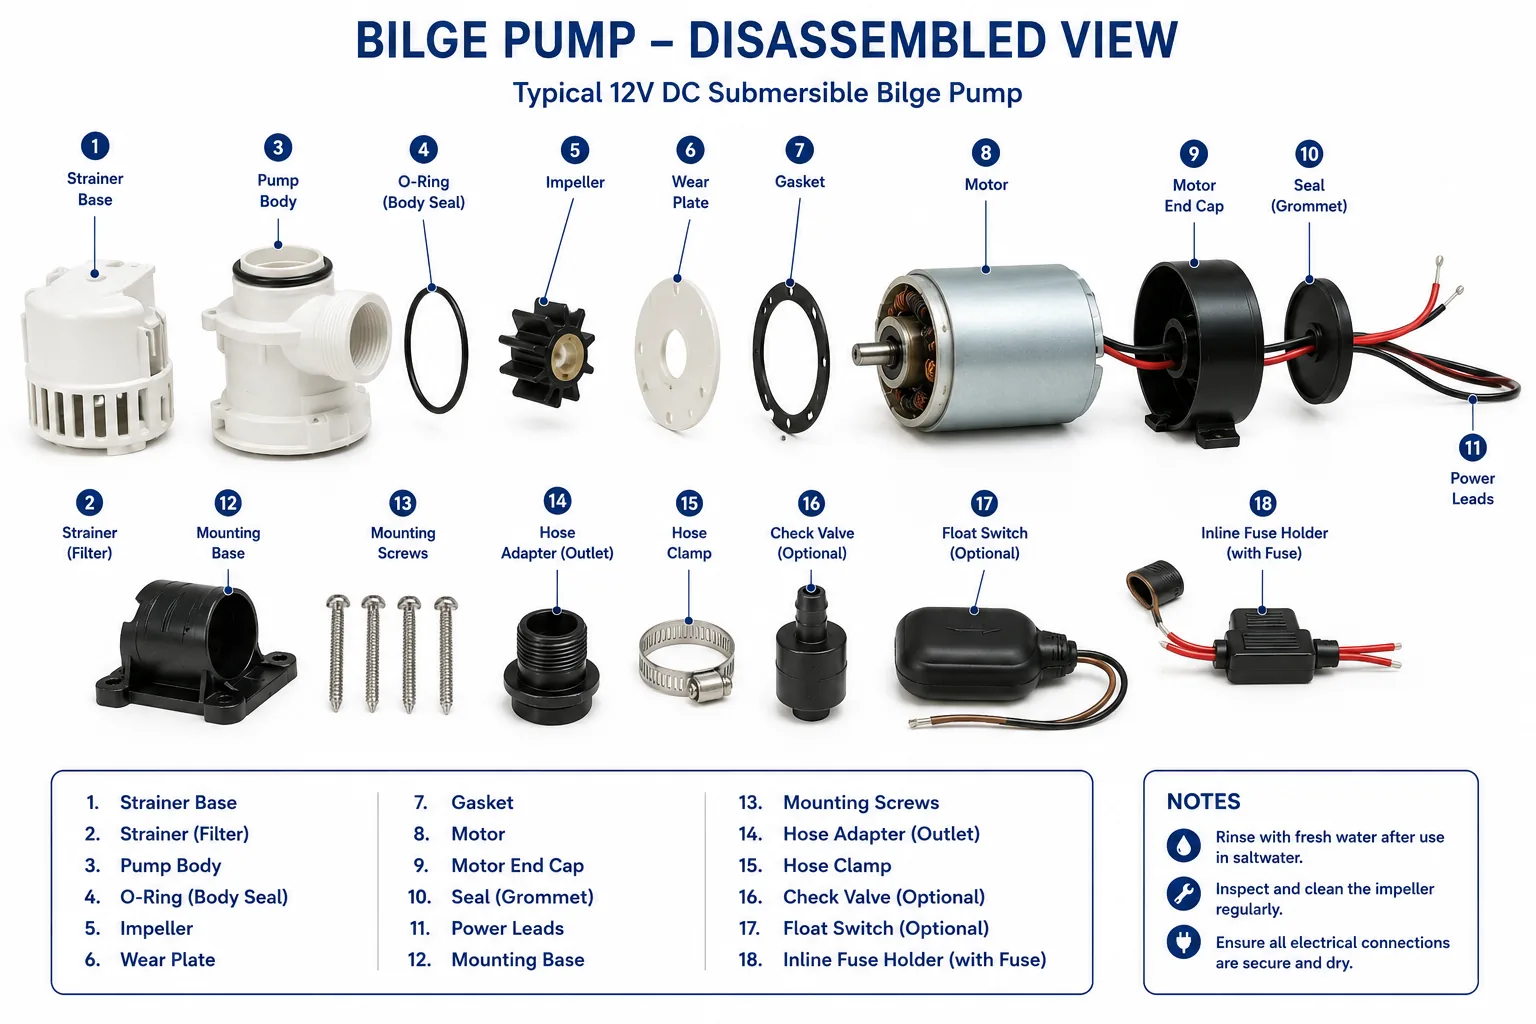
Inspect the bilge pump monthly. Clean debris from the pump housing, test the float switch, verify fuse condition, and inspect all wiring for corrosion. Replace damaged connectors immediately.
Conclusion
A correctly wired bilge pump is essential for onboard safety. Using marine-grade components, proper fuse protection, and regular testing significantly increases reliability and helps prevent flooding emergencies.
Continue reading
Build your Croatia sailing knowledge with related TwoBoat guides, software, guides and planning tools.