
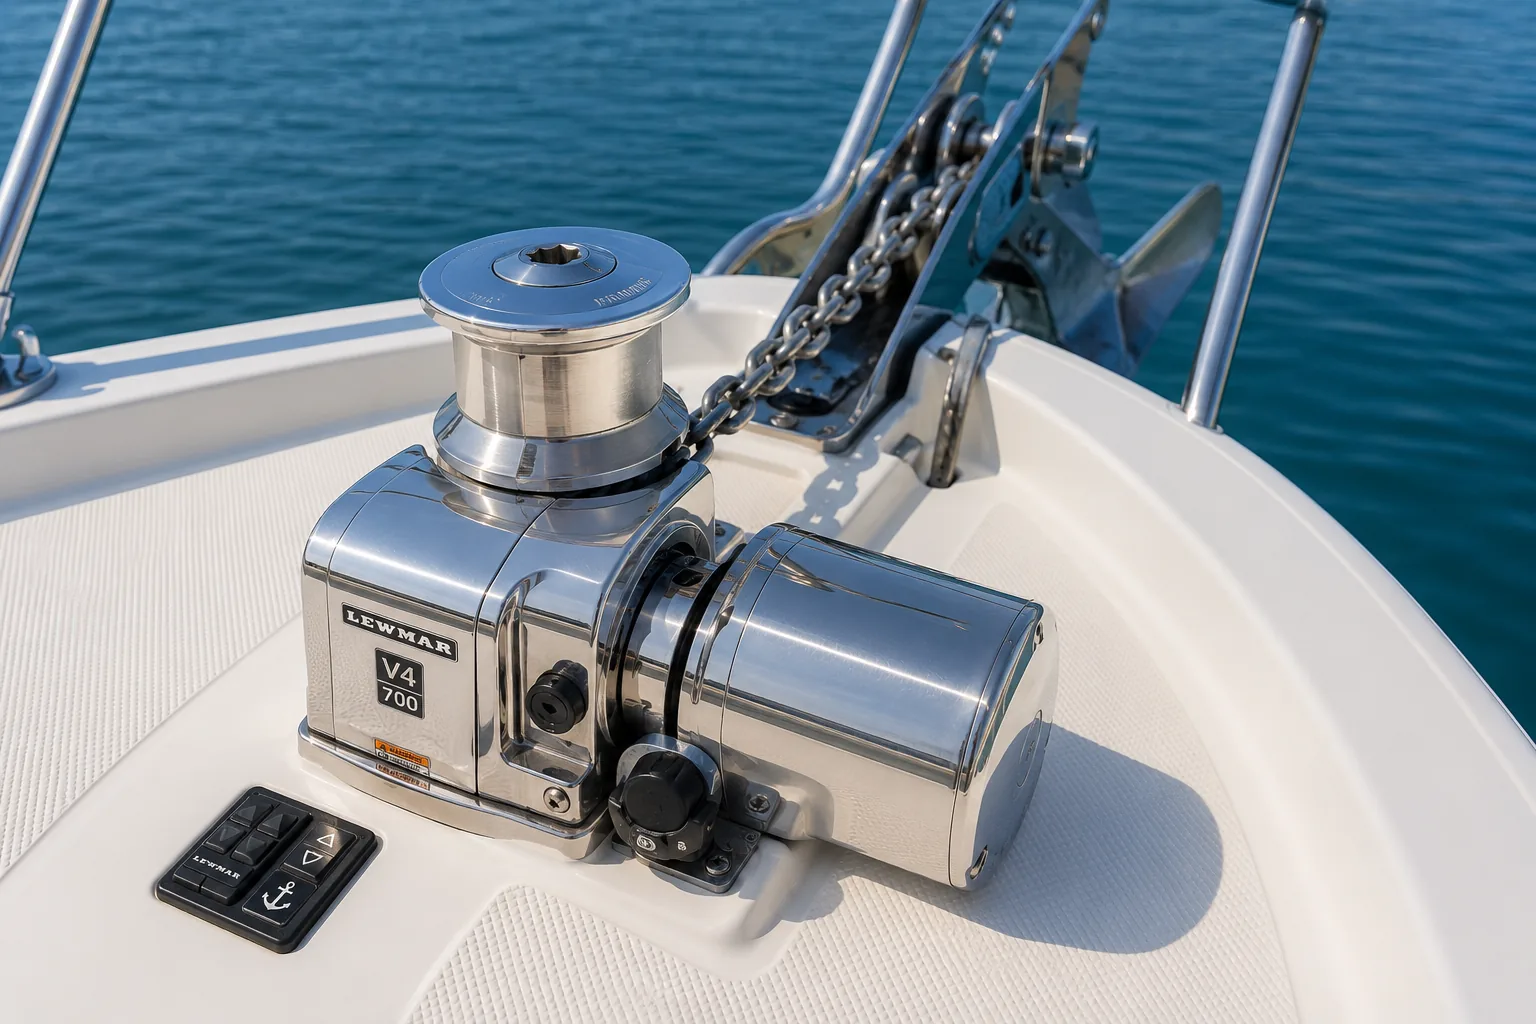
Windlass Maintenance, Common Problems, Diagnosis and Repair
A complete practical guide to maintaining, inspecting and troubleshooting electric and hydraulic anchor windlasses. It covers batteries and high-current wiring, solenoids, controls, motors, brushes, gearboxes, clutches, gypsies, chain, rope, bow rollers, anchor handling, common faults, repair procedures and a final step-by-step problem-solving workflow.
How an anchor windlass works
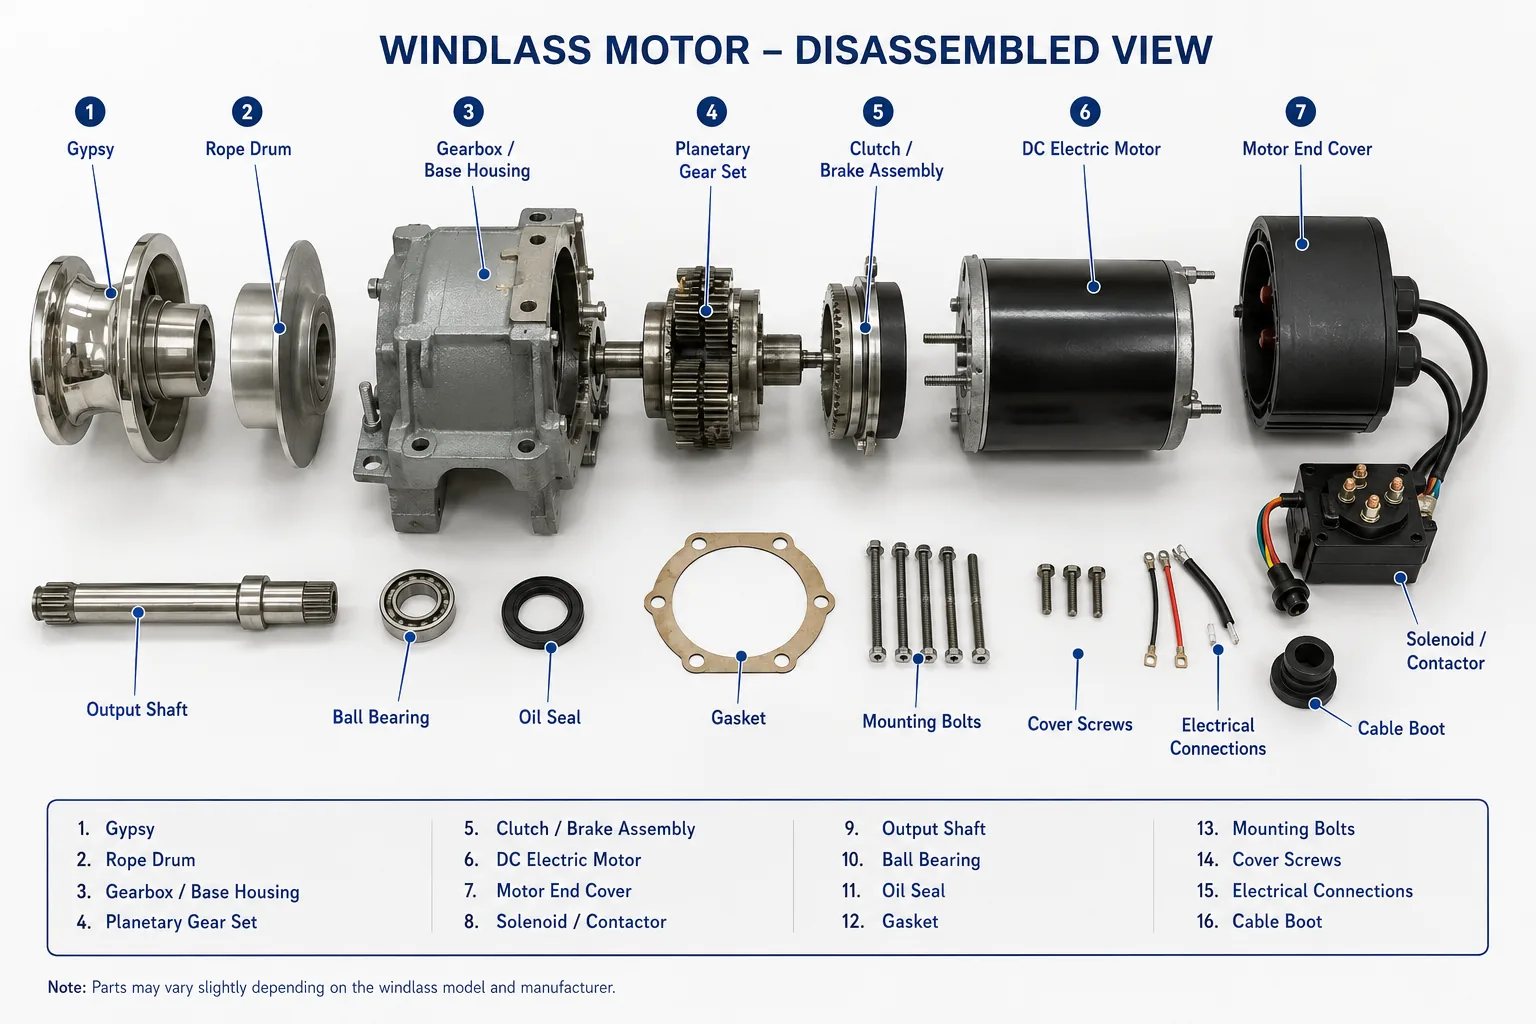
A typical electric windlass consists of a battery or service bank, isolator, circuit breaker or high-current fuse, heavy positive and negative cables, reversing solenoid or electronic controller, deck switches or remote controls, electric motor, gearbox, shaft, clutch, gypsy, chain stripper, chain pipe, bow roller and anchor rode. Pressing UP or DOWN energizes the control circuit, switches high current to the motor and rotates the gypsy in the selected direction.
The gypsy must match the exact chain size and calibration. The clutch allows controlled release and protects the mechanism from some overload conditions. The windlass is designed primarily to lift chain and anchor vertically; the vessel engine should move the boat toward the anchor so the windlass is not used as a towing winch.
Interactive windlass symptom finder
Enter observations such as clicks but does not run, chain jumps, anchor will not deploy, breaker trips, clutch slips, chain locker jams or gearbox grinding. The tool searches the fault sections and ranks likely matches.
Fast triage: what should you check first?
| Symptom | First safe check | Stop and isolate immediately when |
|---|---|---|
| Nothing happens | Battery voltage, isolator, breaker/fuse, control fuse and switch command. | Connections are burned, wet, loose or overheated. |
| Only a click | Measure voltage directly at the motor during the command. | Cables smoke, voltage collapses or current is abnormally high. |
| Motor runs, gypsy stationary | Inspect clutch, drive key, coupling and gearbox. | Grinding, metal fragments or shaft play is present. |
| Chain jumps | Verify chain size/calibration and inspect gypsy wear. | Chain can escape, damage deck hardware or run uncontrolled. |
| Anchor will not retrieve | Relieve vessel load with engine power and inspect for a snag. | Chain is bar-tight, bow is pulled down or breaker repeatedly trips. |
| Breaker trips | Inspect for mechanical jam and verify correct breaker/fuse rating. | A second correct protection device opens or insulation is damaged. |
| Water or corrosion | Isolate power and identify the leak source. | Water has entered motor, solenoid pack or gearbox. |
Preventive windlass and anchor-system maintenance
1. Inspect before departure and before anchoring
- Test short UP and DOWN commands while the anchor is independently secured.
- Confirm the breaker, isolator and control stations operate normally.
- Inspect anchor securing pin, snubber, chain stopper and safety lashing.
- Check the bow roller, swivel, shackles and visible chain for damage.
- Confirm the chain locker is clear and drains freely.
2. Maintain batteries and high-current wiring
- Keep the battery fully charged and test capacity, not only resting voltage.
- Measure motor voltage while retrieving under load.
- Inspect battery posts, breaker, fuse holder, solenoid pack, motor terminals and grounds.
- Clean and tighten connections to manufacturer torque.
- Replace green, brittle, heat-damaged or undersized cables.
- Verify lithium battery-management systems can supply the windlass peak current.
3. Service the gypsy, clutch and capstan
- Remove salt and dirt with fresh water after use.
- Inspect gypsy pockets for wear matching the chain pattern.
- Check clutch cone, mating surfaces, retaining nut, washers, keys and splines.
- Lubricate only the points specified by the manufacturer; many clutch friction surfaces must remain clean and dry.
- Confirm capstan and gypsy rotate smoothly without abnormal play.
4. Inspect chain, rope and connectors
- Wash chain and rope with fresh water and allow them to dry where possible.
- Inspect chain links for corrosion, distortion, elongation and loss of diameter.
- Verify the entire chain is the exact calibration required by the gypsy.
- Inspect rope splice, thimble, shackle, swivel and anchor connection.
- Renew depth markings and verify their accuracy.
- Ensure the bitter end is securely attached but can be released in an emergency.
5. Maintain the bow roller and anchor
- Inspect roller rotation, pin wear, bushings, side cheeks and alignment.
- Check that the anchor self-launches and returns without striking the hull.
- Inspect anchor shank, flukes, welds, hinge points and galvanizing.
- Replace distorted shackles and secure pins with an approved method.
- Confirm the swivel is correctly oriented and moves freely.
6. Inspect motor brushes, solenoids and controls
- Inspect brush length and commutator condition at the model-specific interval.
- Remove carbon dust without contaminating bearings or windings.
- Check solenoids for pitting, sticking, chatter and heat damage.
- Inspect deck switches, remote receivers, connectors and control cables for water ingress.
- Test all control stations and emergency-stop arrangements.
7. Service the gearbox and seals
- Check for lubricant leakage, water contamination, rust and abnormal shaft play.
- Replace oil or grease only if the model specifies a service interval.
- Use the exact lubricant grade and quantity.
- Inspect deck gaskets, shaft seals and mounting hardware.
- Repair leaks before water reaches motor or gearbox components.
8. Maintain the chain locker
- Remove mud, salt, rust flakes and debris.
- Check drainage and ventilation.
- Inspect the chain pipe for sharp edges and alignment.
- Confirm adequate vertical fall below the gypsy.
- Arrange the bitter end and snubber so they do not interfere with chain fall.
9. Operate the windlass correctly
- Use engine power to move the vessel toward the anchor.
- Do not use the windlass to pull the vessel through wind or current.
- Break the anchor out with vessel movement rather than prolonged motor overload.
- Use short operating periods and respect the published duty cycle.
- Use a snubber or chain stopper to carry anchoring loads; do not leave load on the windlass gearbox.
- Secure the anchor independently while underway.
Recommended maintenance schedule
| Interval | Maintenance task | Evidence to record |
|---|---|---|
| Before each anchoring operation | Test controls, inspect anchor securing devices, bow roller and visible chain. | Control response, unusual noise, visible damage. |
| After saltwater use | Rinse windlass, gypsy, chain, roller and locker with fresh water. | Salt/mud condition and drainage. |
| Monthly in active season | Inspect terminals, breaker, solenoid pack, switches, chain wear and locker. | Voltage at rest, corrosion and heat marks. |
| At least annually | Load-test battery, measure motor voltage/current, inspect gypsy, clutch, chain, roller, brushes, seals and gearbox. | Voltage drop, current draw, brush length and chain measurements. |
| Manufacturer service interval | Gearbox lubricant, brush replacement, seal service, chain-counter calibration and hydraulic service. | Lubricant condition, replaced parts and calibration result. |
| After overload, snag or uncontrolled chain event | Inspect chain, gypsy, clutch, shaft, gearbox, motor, breaker and deck structure. | Damage photographs and measured current. |
1. Windlass Is Completely Inoperative
Symptoms
- The windlass does not respond to the deck switches, handheld remote or helm control.
- No solenoid click, motor sound or chain movement is heard.
- The circuit breaker may remain apparently set even though no current reaches the windlass.
- Other onboard 12 V or 24 V equipment may continue to operate normally.
Most likely causes
- Windlass battery or shared service battery is discharged, isolated or internally damaged.
- Main battery switch, circuit breaker or high-current fuse is open.
- Control fuse, emergency stop or low-current enable circuit has failed.
- Loose, corroded, overheated or fractured positive or negative cable connection.
- Deck switch, remote receiver, control panel, solenoid pack or wiring harness has failed.
- Motor thermal protection or electronic protection has operated.
How to confirm the fault
- Secure the vessel and ensure the anchor and chain cannot move unexpectedly. Keep hands, clothing and tools away from the gypsy and chain pipe.
- Check whether any windlass indicator, remote receiver or control panel powers up and whether a fault code is displayed.
- Measure battery voltage directly at the battery posts, not only at the cable clamps.
- Verify the main isolator, circuit breaker and fuse electrically with a multimeter. Do not rely on visual inspection alone.
- Measure voltage at the windlass motor or solenoid-pack input. If voltage exists at the battery but not at the windlass, trace the supply and return paths section by section.
- Check the low-current control fuse and verify that the deck switch or remote produces a command signal.
- Allow the motor to cool for the manufacturer-specified period and retest once. Repeated thermal trips require further diagnosis.
Repair procedure
- Charge and load-test the windlass battery; replace it if capacity or internal resistance is unacceptable.
- Clean and tighten cable lugs, battery posts, breaker terminals, solenoid connections and grounds. Replace heat-damaged or undersized cables.
- Replace a failed fuse or breaker only with the exact approved type and rating after identifying why it opened.
- Repair a failed isolator, control fuse, switch, remote receiver or damaged harness.
- Replace or professionally test the solenoid pack, controller or motor when correct power and command signals are present but the unit remains inactive.
- After repair, test both UP and DOWN in short pulses with the anchor secured and inspect all high-current joints for abnormal heating.
Basic tools
- Digital multimeter
- Insulated socket and spanner set
- Fuse puller
- Battery terminal brush
- Flashlight
- Wiring diagram
Professional diagnostic equipment
- Battery conductance/load tester
- DC clamp ammeter
- Milliohm meter
- Thermal camera
- Manufacturer diagnostic interface
2. Solenoid Clicks but the Motor Does Not Run
Symptoms
- A strong click is heard when UP or DOWN is pressed, but the motor does not rotate.
- The motor may start only after several attempts.
- Cabin lights may dim sharply during the command.
- The breaker may trip if the motor or gearbox is mechanically locked.
Most likely causes
- Weak battery or severe voltage drop in the high-current circuit.
- Burned or pitted solenoid contacts.
- Worn or sticking carbon brushes in a brushed DC motor.
- Motor armature, bearings or gearbox are seized.
- Chain, gypsy, clutch or anchor mechanism is mechanically jammed.
- Motor winding or internal connection has failed.
How to confirm the fault
- Stop immediately if cables become hot, smoke appears or the breaker opens.
- Measure voltage directly at the motor terminals while the command is applied and compare it with battery-post voltage measured at the same moment.
- Perform positive- and negative-side voltage-drop tests under load.
- Use a DC clamp meter to measure current. Very high current with no rotation suggests a mechanical lock or motor fault; low current after a click suggests poor solenoid contact or an open motor circuit.
- Isolate power and inspect the chain, gypsy, clutch and gearbox for mechanical blockage.
- Inspect motor brushes and commutator only according to the windlass service manual.
- Bench-test the motor and solenoid pack if onboard measurements do not isolate the fault.
Repair procedure
- Charge or replace the battery and correct cable sizing or terminal resistance.
- Replace a burned solenoid or complete reversing-solenoid pack.
- Replace motor brushes as a complete approved set and clean carbon dust from the brush housing.
- Release chain or clutch blockage and repair the source of mechanical binding.
- Overhaul or replace a seized gearbox or motor.
- Verify normal voltage, current draw and operation in both directions after repair.
Basic tools
- Digital multimeter
- DC clamp meter
- Insulated hand tools
- Socket set
- Inspection light
Professional diagnostic equipment
- High-current load tester
- Thermal camera
- Motor insulation tester where approved
- Motor and solenoid bench test equipment
3. Motor Runs but the Gypsy Does Not Turn
Symptoms
- The electric motor can be heard running, but the chainwheel remains stationary.
- The motor sounds unusually fast or unloaded.
- The gypsy may move intermittently and then stop under chain load.
- Grinding or metallic rattling may be heard from the gearbox or shaft.
Most likely causes
- Clutch is fully released or slipping.
- Drive key, spline, coupling or shaft has failed.
- Gearbox gears or internal shaft are damaged.
- Gypsy is not correctly seated on the shaft.
- Fasteners, clutch cone or capstan assembly are loose or incorrectly assembled.
- Motor-to-gearbox coupling is stripped.
How to confirm the fault
- Stop operation to prevent further gearbox damage.
- Isolate power and remove chain load from the gypsy.
- Check clutch adjustment and whether the gypsy can be locked correctly.
- Inspect the gypsy, clutch cone, key, spline and retaining hardware.
- Observe whether the motor shaft rotates while the gearbox output remains stationary.
- Check for excessive shaft play, metal particles or lubricant leakage.
- Remove and bench-inspect the motor/gearbox assembly when external components are intact.
Repair procedure
- Clean and correctly adjust the clutch according to the manufacturer procedure.
- Replace worn clutch cones, drive keys, splines, retaining washers or shaft components.
- Refit the gypsy and capstan assembly in the correct order and torque.
- Overhaul or replace the gearbox if gears, shafts or bearings are damaged.
- Replace a stripped motor coupling.
- Test first without load, then with controlled chain load while listening for abnormal noise.
Basic tools
- Socket and hex-key set
- Torque wrench
- Soft-face mallet
- Puller where required
- Cleaning materials
Professional diagnostic equipment
- Gearbox service tools
- Dial indicator
- Borescope
- Bearing pullers and press
4. Windlass Runs Slowly or Struggles Under Load
Symptoms
- The chain retrieves much more slowly than before.
- The motor speed drops sharply as the anchor leaves the seabed.
- The windlass may operate normally with no load but struggle with chain and anchor weight.
- Battery voltage or lighting may collapse during retrieval.
Most likely causes
- Low battery state of charge or loss of battery capacity.
- Excessive voltage drop through long, undersized, loose or corroded cables.
- Worn brushes, damaged commutator or tired motor.
- Gearbox drag, dry bearings or incorrect lubricant.
- Anchor is still embedded, chain is fouled or the boat is being pulled by the windlass.
- Wrong chain, excessive chain friction or poor chain-locker lead.
How to confirm the fault
- Measure voltage directly at the motor during retrieval and compare it with battery voltage.
- Load-test the battery and check charging performance.
- Measure motor current and compare it with model-specific data.
- Inspect and voltage-drop test every high-current connection.
- Retrieve while using the boat engine to move slowly toward the anchor; the windlass should lift chain and anchor, not pull the vessel forward.
- Check chain lead, bow roller, gypsy, chain pipe and locker for friction or misalignment.
- Inspect brushes, commutator, motor bearings and gearbox only after electrical supply is proven healthy.
Repair procedure
- Charge or replace the battery and restore correct charging.
- Install correctly sized cable and replace high-resistance terminals or breaker hardware.
- Replace worn brushes or overhaul the motor.
- Service bearings and gearbox using only approved lubricant and procedures.
- Correct chain lead, bow-roller alignment and chain-locker restrictions.
- Adopt correct operating technique so vessel momentum and engine power relieve anchor load.
Basic tools
- Multimeter
- DC clamp meter
- Battery tester
- Terminal cleaning tools
- Inspection light
Professional diagnostic equipment
- Milliohm meter
- Thermal camera
- Motor current logger
- Gearbox inspection tools
5. Anchor Chain Jumps, Skips or Rides Out of the Gypsy
Symptoms
- The chain bangs, jumps teeth or lifts out of the gypsy pockets.
- Retrieval is jerky and noisy.
- The problem worsens under higher load.
- Some chain sections pass correctly while others skip.
Most likely causes
- Chain size, pitch or calibration does not match the gypsy.
- Gypsy pockets are worn, corroded or damaged.
- Chain links are stretched, twisted, worn or repaired with incompatible links.
- Chain stripper is damaged or incorrectly positioned.
- Gypsy is loose, misaligned or contaminated with hard deposits.
- Chain approaches the gypsy at the wrong angle.
How to confirm the fault
- Stop retrieval before the chain escapes or damages the deck.
- Verify the chain specification and gypsy marking against manufacturer data.
- Inspect a representative length of chain and measure link dimensions and pitch.
- Inspect gypsy pockets for asymmetric wear and sharp or rounded edges.
- Check the chain stripper, gypsy alignment and retaining hardware.
- Observe chain lead from bow roller to gypsy and from gypsy into the locker.
- Mark the problem chain sections to determine whether skipping is localised.
Repair procedure
- Replace chain with the exact calibrated size matched to the gypsy.
- Replace a worn or damaged gypsy.
- Replace stretched, twisted or severely corroded chain rather than mixing incompatible repair links.
- Repair or correctly adjust the chain stripper.
- Correct gypsy alignment and chain lead.
- Clean hard deposits and perform a controlled retrieval test under gradually increasing load.
Basic tools
- Vernier caliper
- Chain gauge
- Socket set
- Inspection light
- Manufacturer chain/gypsy chart
Professional diagnostic equipment
- Chain wear gauge
- Alignment tools
- Gypsy profile templates
6. Anchor Will Not Deploy or Free-Fall
Symptoms
- The anchor remains on the bow roller when DOWN is pressed.
- The gypsy rotates but the chain does not pay out.
- Manual free-fall does not start when the clutch is released.
- The chain moves briefly and then jams.
Most likely causes
- Clutch is too tight, seized or corroded.
- Anchor is mechanically secured by a safety pin, snubber or chain stopper.
- Chain is jammed in the locker, chain pipe or gypsy.
- Anchor is wedged in the bow roller.
- DOWN solenoid, switch or controller has failed.
- Brake or free-fall mechanism is incorrectly adjusted.
How to confirm the fault
- Confirm all anchor safety devices, lashings and chain stoppers are intentionally released.
- Keep feet and hands away from the chain path.
- Check whether the motor responds in DOWN and whether the gypsy turns.
- Test manual clutch release according to the manufacturer procedure.
- Inspect the bow roller and anchor geometry for wedging.
- Inspect the chain pipe and locker for piles, twists or foreign objects.
- Measure the DOWN control signal and solenoid output if the mechanism is mechanically free.
Repair procedure
- Clean and service the clutch and brake mechanism.
- Correct anchor roller geometry or replace worn roller hardware.
- Clear chain locker and improve chain fall below the windlass.
- Repair or replace the DOWN solenoid, switch, remote channel or controller.
- Adjust free-fall or brake components according to the manual.
- Restore and clearly label all anchor-securing devices after testing.
Basic tools
- Windlass handle
- Inspection light
- Socket set
- Plastic or wooden clearing tool
- Multimeter
Professional diagnostic equipment
- Manufacturer diagnostics
- Solenoid test setup
- Alignment tools
7. Anchor Will Not Retrieve
Symptoms
- The windlass stalls or breaker trips while retrieving.
- The chain becomes bar-tight and the bow is pulled downward.
- The motor runs but the clutch slips.
- The anchor reaches the bow but will not seat correctly.
Most likely causes
- Anchor is embedded, snagged or fouled on an underwater obstruction.
- The windlass is being used to pull the vessel against wind or current.
- Battery voltage is low or voltage drop is excessive.
- Clutch is slipping or incorrectly adjusted.
- Chain or gypsy is jammed.
- Motor, gearbox or bow roller is overloaded or damaged.
How to confirm the fault
- Do not continue loading the windlass against a bar-tight chain.
- Use engine power to move slowly toward the anchor while maintaining controlled chain tension.
- Identify whether the anchor can be broken out by changing vessel position and angle.
- Measure motor voltage and current during a short controlled attempt.
- Check clutch condition and adjustment.
- Inspect chain lead, bow roller and locker for jamming.
- Use professional diving assistance if the anchor is snagged and cannot be safely freed.
Repair procedure
- Relieve load with engine manoeuvring and use proper anchor-breaking technique.
- Use a snubber, chain hook or manual recovery arrangement rated for the load.
- Free or abandon a dangerously snagged anchor if necessary for vessel safety.
- Restore battery and cable performance.
- Service the clutch and replace worn friction surfaces.
- Repair damaged bow roller, gypsy, chain or gearbox after overload.
Basic tools
- Windlass handle
- Snubber or chain hook
- Boat hook
- Multimeter
- Protective gloves
Professional diagnostic equipment
- Diving equipment operated by professionals
- Load-rated recovery gear
- Current and voltage logging equipment
8. Circuit Breaker Trips or Main Fuse Repeatedly Opens
Symptoms
- The breaker trips immediately when UP or DOWN is pressed.
- The fuse opens during heavy retrieval.
- A replacement fuse fails again.
- Cables, solenoids or motor may smell hot.
Most likely causes
- Chain, gypsy, clutch or gearbox is mechanically jammed.
- Motor, cable or solenoid has a short circuit.
- Incorrect breaker or fuse rating/type has been installed.
- Motor current is excessive because of low voltage, worn bearings or gearbox damage.
- Battery or wiring has been incorrectly modified.
- Anchor load exceeds the windlass rating.
How to confirm the fault
- Do not install progressively larger fuses or bypass the breaker.
- Isolate the system and inspect mechanical components before electrical testing.
- Compare the installed protection device with the windlass specification.
- Inspect cables for chafing, crushed insulation, water ingress and heat damage.
- Measure current with the correct protection fitted during a brief controlled test.
- Separate motor, solenoid and cable sections for professional short-circuit testing.
- Verify that anchor, chain and vessel size are within the windlass rating.
Repair procedure
- Remove mechanical blockage and repair gypsy, clutch or gearbox damage.
- Replace shorted or heat-damaged cables, solenoids or motor.
- Install only the correct marine-rated breaker/fuse and holder.
- Correct cable sizing and routing.
- Repair bearings, gearbox or motor causing excessive current.
- Use proper retrieval technique and avoid loads beyond the windlass design.
Basic tools
- Multimeter
- Correct spare fuse
- Insulated tools
- Inspection light
- Service manual
Professional diagnostic equipment
- DC clamp meter with inrush capture
- Thermal camera
- Insulation tester where approved
- Current-limited test supply
9. Motor Overheats or Stops During Retrieval
Symptoms
- The windlass stops during a long retrieval and works again after cooling.
- The motor housing or nearby cables become very hot.
- A thermal alarm or protection code appears.
- Available run time becomes shorter than in previous seasons.
Most likely causes
- Published duty cycle has been exceeded.
- Low voltage increases current and heat.
- Anchor load is too high or the windlass is pulling the vessel.
- Gypsy, clutch, bearings or gearbox have excessive friction.
- Motor brushes, commutator or bearings are worn.
- Ventilation is poor or motor compartment temperature is excessive.
How to confirm the fault
- Stop and allow the motor to cool naturally; never bypass thermal protection.
- Review the windlass duty-cycle limit and recent operating time.
- Measure motor voltage and current during retrieval.
- Check whether the chain is bar-tight and whether the vessel is being moved by the windlass.
- Inspect mechanical drag in gypsy, clutch, shaft and gearbox.
- Inspect motor ventilation, carbon dust, moisture and bearing condition.
- Compare temperature rise and current draw with model-specific service data.
Repair procedure
- Use shorter operating periods with pauses.
- Move the vessel toward the anchor with engine power.
- Restore correct voltage and cable condition.
- Service clutch, bearings and gearbox.
- Replace worn brushes, bearings or motor.
- Improve ventilation only in a way that preserves required water and ignition protection.
Basic tools
- Multimeter
- DC clamp meter
- Infrared thermometer
- Service manual
- Cleaning tools
Professional diagnostic equipment
- Thermal camera
- Data logger
- Motor current/temperature test equipment
10. Gypsy Clutch Slips Under Load
Symptoms
- The motor and shaft rotate but the gypsy stops under chain load.
- The clutch requires frequent tightening.
- The chain can pay out unexpectedly.
- Burnishing, heat or metallic dust may appear around the clutch.
Most likely causes
- Clutch is incorrectly adjusted.
- Clutch cone or mating surface is worn, glazed, contaminated or corroded.
- Grease has been applied to a dry friction surface where prohibited.
- Retaining nut, washer or key is damaged.
- Anchor load exceeds the windlass capacity.
- Assembly order is incorrect after previous service.
How to confirm the fault
- Secure the anchor independently before testing.
- Compare clutch assembly order with the exploded parts diagram.
- Inspect cone and mating surfaces for glazing, wear and contamination.
- Check retaining hardware and shaft key.
- Verify clutch adjustment procedure and torque.
- Confirm windlass rating against anchor and chain load.
Repair procedure
- Clean friction surfaces using only approved products.
- Replace worn clutch cone, mating component or retaining hardware.
- Reassemble in the exact specified order.
- Adjust clutch so it transmits retrieval load while retaining intended overload protection.
- Remove prohibited lubricant from friction surfaces while lubricating only specified threads or bearings.
- Perform a controlled load test with the anchor independently secured.
Basic tools
- Windlass handle
- Socket set
- Cleaning materials
- Torque wrench
- Exploded parts diagram
Professional diagnostic equipment
- Surface inspection tools
- Shaft and key measurement tools
11. Chain Jams in the Hawse Pipe or Piles Up in the Locker
Symptoms
- The windlass stops even though the motor and gypsy are functional.
- Chain forms a tall pile directly below the chain pipe.
- Someone must repeatedly spread chain by hand in the locker.
- Deployment stops because chain does not run freely.
Most likely causes
- Insufficient vertical drop below the gypsy.
- Locker geometry is too small or chain lands in one location.
- Chain is dirty, rusty, twisted or stiff.
- Chain pipe is rough, narrow, misaligned or obstructed.
- Water, mud or debris accumulates in the locker.
- Chain bitter-end arrangement interferes with chain fall.
How to confirm the fault
- Isolate power before entering or reaching into the chain locker.
- Observe chain fall from a safe position during slow retrieval.
- Measure available vertical drop and compare with manufacturer installation requirements.
- Inspect the chain pipe for sharp edges, corrosion and misalignment.
- Inspect chain cleanliness, twist and stiffness.
- Check locker drainage and bitter-end routing.
Repair procedure
- Clean the chain and locker with fresh water and remove mud/debris.
- Correct chain-pipe alignment and smooth approved surfaces.
- Modify chain landing position or add a safe chain-distribution solution.
- Increase locker volume or vertical fall where installation permits.
- Replace severely stiff, distorted or corroded chain.
- Re-route and securely attach the bitter end so it remains releasable in an emergency.
Basic tools
- Inspection light
- Protective gloves
- Fresh-water hose
- Plastic scraper
- Measuring tape
Professional diagnostic equipment
- Installation geometry assessment
- Fiberglass or metal fabrication tools
12. Foot Switch, Handheld Remote or Helm Control Does Not Work
Symptoms
- One control station works while another does not.
- UP works but DOWN does not, or the opposite.
- A foot switch works only when pressed in a particular position.
- Wireless remote range is poor or intermittent.
Most likely causes
- Water ingress or corrosion inside a deck switch.
- Broken switch membrane, spring or wiring connection.
- Remote battery is discharged or receiver pairing is lost.
- Control fuse or common return is open.
- Damaged harness, connector pin or relay input.
- Wireless interference or failed receiver.
How to confirm the fault
- Test every control station separately.
- Check whether the solenoid receives a command from the failed station.
- Measure switch continuity with power isolated.
- Inspect deck switches and connectors for moisture and corrosion.
- Replace the remote battery and verify pairing procedure.
- Measure receiver supply voltage and output.
- Inspect common control ground and fuse.
Repair procedure
- Replace a water-damaged or mechanically worn switch.
- Repair and seal wiring using marine-grade methods.
- Replace remote battery and re-pair the transmitter.
- Replace a failed receiver or control relay input.
- Fit protective covers and improve drainage around deck switches.
- Test all stations in both directions before service.
Basic tools
- Multimeter
- Small screwdrivers
- Connector tools
- Replacement remote battery
- Contact cleaner
Professional diagnostic equipment
- Manufacturer remote diagnostics
- Signal tester where applicable
- Known-good control station
13. Gearbox Leaks Lubricant or Produces Grinding Noise
Symptoms
- Oil or grease appears below the windlass.
- Grinding, rumbling or cyclic noise is heard under load.
- Output shaft has excessive play.
- Windlass speed decreases and current rises.
Most likely causes
- Failed shaft seal, O-ring or gasket.
- Worn bearings or damaged gears.
- Incorrect, contaminated or insufficient lubricant.
- Water ingress caused corrosion inside the gearbox.
- Loose housing fasteners or cracked casing.
- Misalignment between motor, gearbox and shaft.
How to confirm the fault
- Stop operation if grinding, metal particles or rapid leakage is present.
- Identify the lubricant type and whether the model is user-serviceable.
- Inspect leakage source, casing, shaft and fasteners.
- Check output-shaft play and smoothness with power isolated.
- Inspect drained lubricant for water or metal particles where permitted.
- Measure motor current and compare no-load noise with loaded noise.
- Remove and disassemble only according to the workshop manual.
Repair procedure
- Replace seals, gaskets and O-rings.
- Refill with the exact specified lubricant and quantity.
- Replace worn bearings, gears or shaft components.
- Repair water ingress and corrosion damage.
- Replace a cracked or badly corroded gearbox housing.
- Align and correctly torque the motor/gearbox assembly.
Basic tools
- Drain container
- Socket set
- Seal picks
- Torque wrench
- Correct lubricant
Professional diagnostic equipment
- Bearing pullers and press
- Gear inspection equipment
- Dial indicator
- Borescope
14. Water Ingress, Motor Corrosion or Wet Electrical Components
Symptoms
- Rust, green corrosion or salt deposits are visible on the motor or terminals.
- The windlass becomes intermittent after rain, washdown or heavy seas.
- Breaker trips or motor current becomes abnormal.
- Motor bearings become noisy or insulation resistance falls.
Most likely causes
- Deck seal or mounting gasket has failed.
- Capstan/shaft seal allows water into the motor or gearbox area.
- Chain locker spray or washdown reaches unprotected components.
- Condensation accumulates in a poorly ventilated compartment.
- Cable glands or covers are damaged.
- Previous corrosion was cleaned superficially without replacing damaged parts.
How to confirm the fault
- Isolate power immediately if water has reached high-current equipment.
- Trace water paths from deck, chain locker, shaft and cable glands.
- Inspect motor, terminals, solenoid pack and gearbox for corrosion.
- Measure insulation only using a method approved for the motor and attached electronics.
- Inspect mounting gasket and shaft seals.
- Check locker drainage and ventilation.
- Bench-test and disassemble the motor if water entry is confirmed.
Repair procedure
- Repair deck, gasket, cover, gland or shaft-seal leakage.
- Dry, clean and replace water-damaged cables, terminals, solenoids and motor parts.
- Replace corroded bearings and brushes.
- Apply manufacturer-approved protection to terminals after repair.
- Improve drainage and ventilation while preserving required protection.
- Perform insulation, current and functional tests before returning to service.
Basic tools
- Inspection light
- Multimeter
- Absorbent materials
- Seal tools
- Cleaning materials
Professional diagnostic equipment
- Insulation-resistance tester where approved
- Motor test bench
- Thermal camera
- Borescope
15. Anchor Jams in the Bow Roller or Will Not Self-Launch
Symptoms
- The chain pays out but the anchor remains on the roller.
- The anchor must be pushed manually to launch.
- The anchor returns upside down or strikes the bow.
- The shank or swivel binds between roller cheeks.
Most likely causes
- Anchor and roller geometry are incompatible.
- Roller diameter, width or position is incorrect.
- Anchor swivel is too large, stiff or installed incorrectly.
- Roller is seized, worn flat or misaligned.
- Safety pin or securing device is still engaged.
- Chain lead pulls the anchor into a binding angle.
How to confirm the fault
- Secure the anchor before inspecting.
- Operate the windlass slowly while observing the anchor path from a safe position.
- Check roller rotation, side clearance and alignment.
- Inspect swivel movement and orientation.
- Compare anchor dimensions with roller geometry.
- Check for impact marks showing where binding occurs.
Repair procedure
- Replace seized or worn rollers and bearings.
- Correct roller alignment, width or position.
- Fit a compatible swivel or connector and install it correctly.
- Modify or replace the bow roller assembly through a qualified fabricator.
- Add appropriate anchor-securing and anti-launch arrangements.
- Test self-launch and retrieval repeatedly in calm conditions.
Basic tools
- Inspection light
- Socket set
- Measuring tape
- Straightedge
- Protective gloves
Professional diagnostic equipment
- Fabrication and alignment tools
- Load-rated roller design assessment
16. Chain Counter Is Inaccurate or Stops Counting
Symptoms
- Displayed chain length differs from the actual deployed length.
- The counter works intermittently or only in one direction.
- The display stays at zero although the gypsy rotates.
- Automatic stop occurs too early or too late.
Most likely causes
- Sensor or magnet gap is incorrect.
- Magnet is missing, corroded or incorrectly oriented.
- Sensor wiring or connector is damaged.
- Counter calibration, gypsy circumference or chain setting is wrong.
- Display/controller has lost configuration.
- Electrical noise or unstable supply affects the signal.
How to confirm the fault
- Do not rely on automatic stop until the counter is proven accurate.
- Inspect the sensor, magnet and mounting gap.
- Rotate the gypsy slowly and check sensor pulses with a meter or diagnostic display.
- Inspect wiring and supply voltage.
- Measure a known deployed chain length and compare with display.
- Review calibration values and reset procedure.
- Check whether counts are correct in both directions.
Repair procedure
- Refit or replace the magnet and sensor.
- Repair damaged wiring and connectors.
- Set the correct sensor gap.
- Recalibrate using a measured chain length and correct gypsy parameters.
- Restore stable supply and grounding.
- Replace the display/controller if sensor pulses are correct but counting remains faulty.
Basic tools
- Multimeter
- Feeler gauge or ruler
- Inspection light
- Known measured chain length
Professional diagnostic equipment
- Oscilloscope or pulse counter
- Manufacturer diagnostics
17. Hydraulic Windlass Is Weak, Slow or Inoperative
Symptoms
- Windlass speed is low despite normal engine or hydraulic-pump operation.
- The unit stalls under moderate load.
- Hydraulic hoses or valves become hot.
- Oil leakage, foaming or pump noise is present.
Most likely causes
- Low hydraulic-fluid level, aeration or contaminated fluid.
- Insufficient system pressure or flow.
- Relief valve is set incorrectly or stuck.
- Directional valve, motor or pump is worn.
- Hydraulic hose is restricted, damaged or leaking.
- Mechanical windlass load is excessive.
How to confirm the fault
- Secure the anchor and relieve hydraulic pressure before opening the system.
- Check fluid level, condition and signs of aeration.
- Inspect hoses, fittings and valves for leaks or collapse.
- Measure pressure and flow at approved test points.
- Check relief-valve setting against specification.
- Separate hydraulic weakness from gearbox/gypsy mechanical drag.
- Test hydraulic motor leakage and efficiency professionally.
Repair procedure
- Correct fluid level and replace contaminated fluid and filters.
- Bleed air using the approved procedure.
- Repair leaking or restricted hoses and fittings.
- Adjust or replace the relief valve.
- Overhaul the directional valve, hydraulic motor or pump as confirmed.
- Repair windlass mechanical drag before retesting.
Basic tools
- Inspection light
- Absorbent pads
- Correct hydraulic fluid
- Basic hand tools
Professional diagnostic equipment
- Hydraulic pressure gauge
- Flow meter
- Temperature probe
- Hydraulic motor leakage test equipment
Step-by-step windlass problem solving
Use this sequence from the safest and simplest checks toward invasive testing. Do not begin by replacing the motor, solenoid or gearbox without measurements.
Secure the vessel and anchor
Secure the boat, prevent uncontrolled chain movement and support or lash the anchor independently. Isolate electrical or hydraulic power before physical inspection.
Define the exact symptom
Record whether UP, DOWN or both fail; whether a click is heard; whether the motor rotates; whether the gypsy rotates; whether the chain jumps; and whether the breaker trips.
Inspect the anchor path
Check anchor security, bow roller, swivel, chain, gypsy, chain stripper, chain pipe and locker for visible jamming or misalignment.
Inspect for water, heat and corrosion
Look for burned terminals, melted insulation, rust, green corrosion, wet controls, gearbox leakage and unusual smells.
Verify battery condition
Measure battery voltage at the posts and perform a load or conductance test. Resting voltage alone does not prove the battery can deliver windlass current.
Check breaker, fuse and isolator
Verify continuity and voltage through each device. Do not replace protection with a higher rating.
Measure motor voltage under load
Measure directly at the motor or solenoid output during a brief command and compare it with simultaneous battery-post voltage.
Perform voltage-drop tests
Test positive and negative paths, then divide the circuit into sections until the high-resistance connection is found.
Measure current and interpret it
High current with little movement indicates overload, mechanical binding or motor failure. Low current after a click suggests poor solenoid contacts or an open motor circuit.
Separate control faults from power faults
Check whether deck switches, remotes and helm controls deliver a command to the solenoid or controller. Never bridge high-current terminals as a casual test.
Inspect clutch and gypsy
Check clutch adjustment, friction surfaces, key, shaft, gypsy wear, chain match and chain stripper condition.
Inspect motor, brushes and solenoids
After electrical supply and mechanical load are proven, inspect brushes, commutator, motor bearings, winding connections and reversing solenoids.
Inspect gearbox and seals
Investigate grinding, leakage, shaft play, water contamination and metal particles. Repair seal failures before further operation.
Confirm chain and anchor compatibility
Verify chain calibration, gypsy model, anchor weight, bow-roller geometry and windlass rating.
Repair only the confirmed cause
Fit exact approved parts and follow model-specific torque, sealing, lubrication and adjustment procedures.
Complete a controlled post-repair test
Test UP and DOWN in short pulses, then under controlled chain load. Confirm normal voltage, current, speed, clutch operation, chain feed, noise and temperature.
Document the result
Record battery test values, motor voltage, voltage drop, current draw, chain dimensions, brush length, replaced parts and photographs.
When to call a professional
- The breaker or correct fuse repeatedly opens.
- High-current cables, solenoids or terminals overheat.
- The chain runs uncontrolled or the clutch cannot be adjusted safely.
- Water has entered the motor or gearbox.
- Grinding, metal particles or excessive shaft play is present.
- The anchor is snagged underwater and cannot be safely freed.
- Deck structure, bow roller or windlass mounting shows cracking or movement.
- A hydraulic system requires pressure, flow or relief-valve testing.
Manage Windlass Inspections and Repairs Digitally
TwoBoat Fleet Maintenance and Work Order Management can be used to schedule annual windlass service, record battery and current measurements, attach chain and gypsy photographs, track anchor-system parts, assign technicians and maintain a complete repair history for every vessel.
Explore Fleet Maintenance Software · Explore Work Order Management · Explore Charter Management Software
Frequently asked questions
How often should a windlass be serviced?
Perform functional and visual checks throughout the season, rinse after saltwater use and complete a detailed inspection at least annually or at the manufacturer interval.
Should the windlass pull the boat toward the anchor?
No. Use the engine to move the vessel toward the anchor. The windlass should primarily lift chain and anchor rather than tow the vessel through wind or current.
Why does the chain jump on the gypsy?
The usual causes are mismatched chain calibration, worn gypsy pockets, stretched or twisted chain, damaged stripper or incorrect chain lead.
Can I fit a larger breaker because the original trips?
No. Repeated tripping indicates overload, low voltage, a jam, short circuit, motor or gearbox problem, or incorrect operating technique.
Should the clutch be greased?
Only where the exact service manual permits it. Many clutch friction surfaces must remain clean and dry while threads or bearings may require specific lubrication.
Why does the chain pile up in the locker?
Common causes are insufficient vertical fall, poor locker geometry, dirty or stiff chain, misaligned chain pipe and inadequate drainage.
Should anchoring load remain on the windlass?
No. Use a properly sized snubber or chain stopper so wave and wind loads are not carried by the gearbox and deck mounting.
Can a windlass be tested without chain load?
A brief unloaded functional test may be permitted, but final testing should include a controlled load and must follow the manufacturer procedure.
Continue reading
Build your Croatia sailing knowledge with related TwoBoat guides, software, guides and planning tools.