
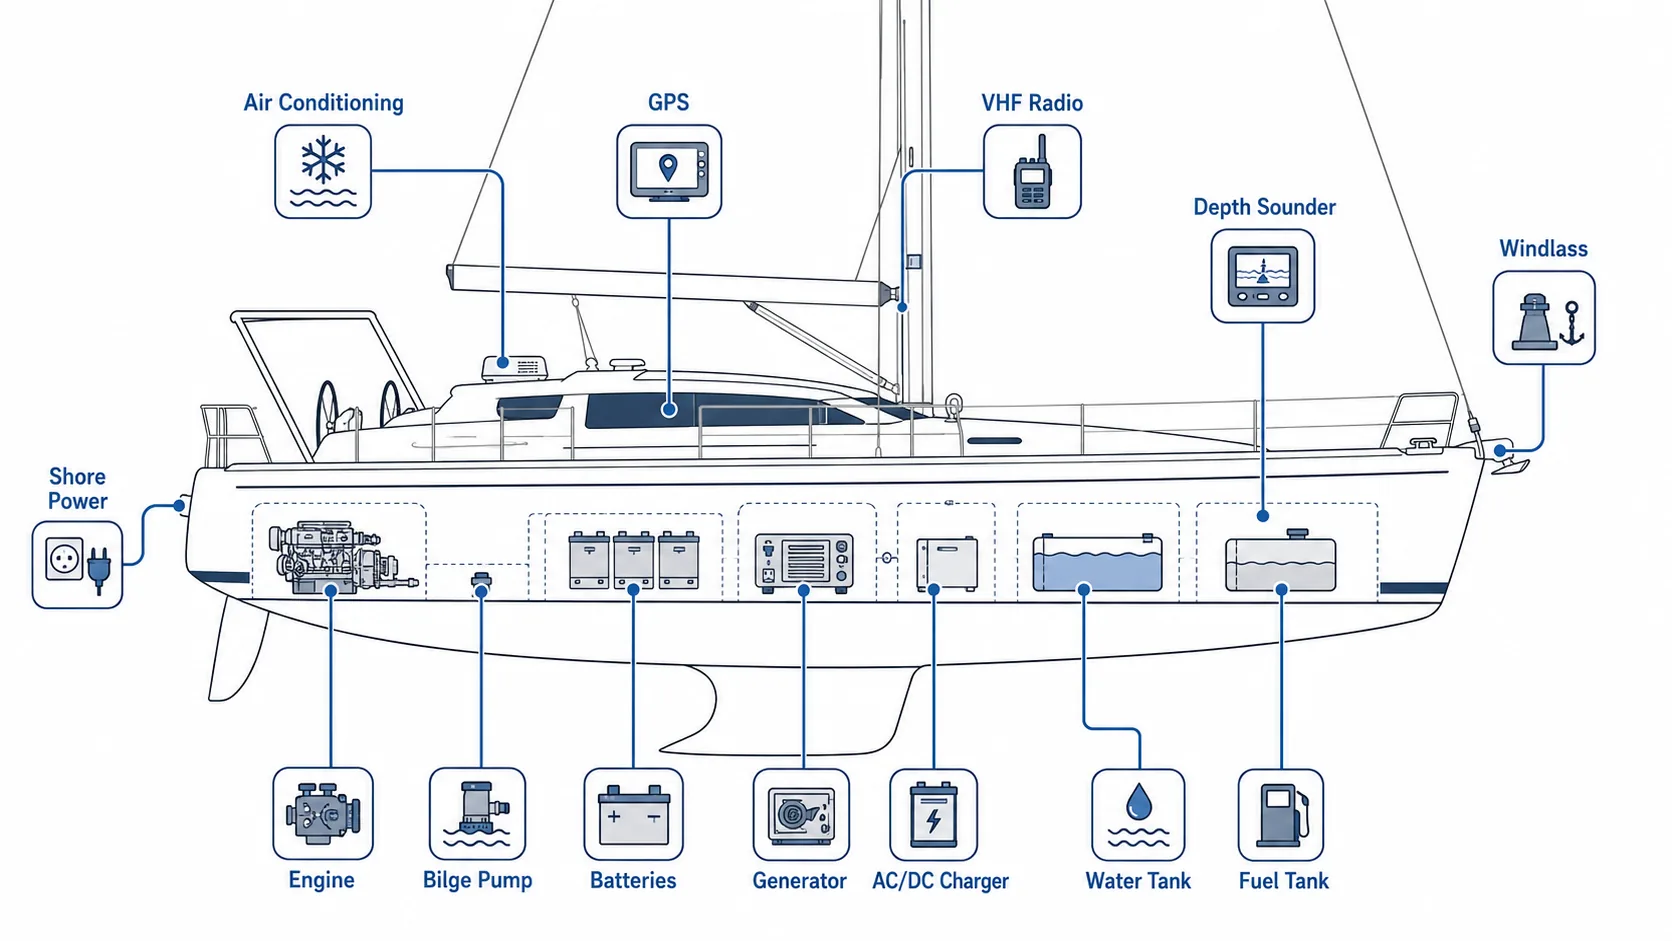
A yacht can look ready from the outside and still have several small problems waiting to show up after departure. A weak battery, a bilge pump that does not start, a windlass with a tripped breaker, a generator that runs but does not produce 220V, or a depth sounder that shows no reading can quickly turn a normal sailing day into a stressful one.
This guide is written as a practical functional checklist for skippers, bareboat charter guests, boat owners and crew members. The goal is simple: before leaving the marina, test the systems you may actually need at sea.
This is not a repair manual and it does not replace a professional mechanic or electrician. It is a hands-on inspection routine: switch it on, test it, look at the panel, listen, check the expected result, and know what to check first if something does not work.
For a wider departure routine, combine this systems test with the Boat Safety Checklist. If you are chartering without a professional skipper, it also helps to review the Bareboat Skippering Guide before handover, so the technical checks fit naturally into your normal departure routine.
Tick off the checks as you complete them. Your progress is saved in this browser.
0 checks completed.
How to Use This Checklist
Do this inspection while the yacht is still safely tied in the marina. Some checks require shore power, some require the engine, and some require the generator. Do not run systems dry, do not open electrical panels unless you are qualified, and do not bypass fuses or breakers.
- Check fuel, oil, water, batteries and panels.
- Start the engine and check engine instruments.
- Test bilge pumps and essential DC systems.
- Test windlass, navigation electronics and VHF.
- Test shore power, generator and AC loads.
- Test water system, toilets, fridge, freezer and air conditioning.
- Review safety equipment and emergency access.
Think of this as the practical systems layer of your pre-departure preparation. The general safety equipment, crew briefing and route planning belong in the broader boat safety checklist, while this page focuses on whether the yacht's working systems actually respond when you need them.
Quick Functional Checklist Before Departure
| System | Functional Test | Expected Result | Done |
|---|---|---|---|
| Bilge pump | Lift the float switch by hand. | Pump starts immediately. | |
| Engine | Start engine and observe panel. | Oil pressure normal, temperature stable, cooling water visible. | |
| Gearbox | Engage forward and reverse briefly while secured. | Clear change in propeller thrust. | |
| Generator | Start generator and check AC panel. | Stable 220–240V shown on panel. | |
| Battery charger | Connect shore power or generator AC. | AC/DC charger active and batteries charging. | |
| Windlass | Press UP and DOWN on joystick. | Windlass runs both directions. | |
| VHF | Switch on, set volume/squelch, listen or radio check where permitted. | Receives clearly and transmits when tested correctly. | |
| GPS/plotter | Power on and wait for position. | Correct position and chart display. | |
| Depth sounder | Check reading while in known depth. | Depth value is realistic and stable. | |
| Water tanks | Check gauge and run taps briefly. | Gauge shows level and pump gives pressure. |
Engine Functional Checks
The engine is not only for motoring. It is your main tool for marina manoeuvres, charging, avoiding danger, and controlling the boat when the wind disappears or becomes too strong.
On a bareboat charter, these checks should be done before the lines are released, not after the first tight manoeuvre. A calm handover is the best moment to ask questions, confirm what is normal on that specific yacht and connect the engine test with the wider bareboat skippering routine.
| Check | How to Test | Expected Result | If It Fails | Done |
|---|---|---|---|---|
| Engine oil level | Pull the dipstick, wipe, reinsert, pull again. | Oil is between MIN and MAX marks. | Do not start if oil is very low. Ask base or mechanic. | |
| Engine start | Start the engine from the panel. | Starts without excessive cranking or alarms. | Check battery switch, neutral gear position, kill switch, fuel valve. | |
| Cooling water | Look at the exhaust outlet after start. | Raw water exits with exhaust pulses. | Stop engine if no water appears. Check seacock, strainer, impeller with base staff. | |
| Oil pressure | Watch dashboard after engine starts. | Oil pressure warning goes off quickly. | Stop engine if oil alarm continues. Check oil level and call base. | |
| Engine temperature | Run engine until it warms up. | Temperature stays in normal range. | If temperature climbs fast, stop engine and inspect cooling system. | |
| Forward gear | While securely tied, engage forward briefly at idle. | You feel propeller thrust pushing forward. | Check throttle/gear control. Report if no thrust. | |
| Reverse gear | Engage reverse briefly at idle. | You feel reverse thrust and direction change. | Do not depart if reverse is unreliable. It is critical for docking. | |
| Alternator charging | Check voltage before and after engine start. | Voltage rises when engine is running. | Check alternator belt, battery monitor and charging breaker. |
Bilge Pump Checks
Do not assume the bilge pump works because the switch exists. Test it. A working bilge pump is a basic safety requirement.
If you are unsure what should happen when you lift the float switch, or why the pump works from the panel but not automatically, the bilge pump wiring guide explains the common float switch, fuse and wiring layouts found on small yachts.
| Check | How to Test | Expected Result | If It Fails | Done |
|---|---|---|---|---|
| Automatic bilge pump | Lift the float switch carefully by hand. | Pump starts immediately. | Check battery switch, bilge pump breaker/fuse, float switch and wiring. | |
| Manual bilge switch | Use the panel switch for bilge pump. | Pump runs while switch is activated. | Check DC panel breaker and pump fuse. | |
| Manual hand pump | Insert handle and pump several strokes. | Pump moves air/water through the outlet. | Check handle, hose, pickup and outlet blockage. | |
| Bilge condition | Open bilge access and inspect visually. | Bilge is mostly dry and clean. | If water is present, find the source before departure. |
Fuel, Oil and Tank Level Checks
| System | How to Test | Expected Result | If It Fails | Done |
|---|---|---|---|---|
| Fuel level | Read gauge and confirm with charter handover. | Fuel level matches expected check-in state. | Ask base to confirm. Do not leave with unclear fuel state. | |
| Fuel valve | Ask where fuel shutoff is and confirm open position. | Valve is open and accessible. | Do not force valves. Ask base staff. | |
| Fuel smell/leaks | Inspect engine space and bilge area. | No diesel smell or visible leak. | Report immediately. Do not ignore fuel smell. | |
| Water tanks | Read tank gauge and run taps briefly. | Gauge shows level and pump pressurizes system. | Check pump switch, tank selector and water pump breaker. | |
| Black water tank | Check indicator if installed and understand discharge rules. | Tank status is clear before departure. | Ask base how to empty/use holding tank legally. |
Batteries and DC Electrical System
The DC system powers the equipment you need most often: lights, instruments, VHF, pumps, fridge controls, windlass controls and sometimes toilets.
Many electrical problems at handover are not caused by broken equipment, but by battery switches, isolation settings or a bank that has not been charged properly. Before troubleshooting every device separately, make sure you understand how to isolate boat batteries and which switch controls the engine and house circuits.
| Check | How to Test | Expected Result | If It Fails | Done |
|---|---|---|---|---|
| Battery voltage | Read monitor or panel voltage. | House batteries show healthy voltage. | Charge batteries and ask base if voltage is low. | |
| Main battery switches | Locate engine and house battery switches. | Switch positions are understood. | Ask base to explain before departure. | |
| DC panel | Turn on key circuits one at a time. | Labels match working devices. | Note wrong labels or failed circuits. | |
| Battery charger | Connect shore power or run generator and check charger. | Charger indicates charging and voltage rises. | Check AC breaker, charger breaker, shore power/generator source. |
Generator and AC Power Checks
A generator can run and still fail to deliver usable AC power. Always check the AC panel after starting it.
After AC power appears on the panel, also check whether the battery charger has started. This simple step connects the generator test with battery management, because a working charger is what keeps the house bank healthy once you leave shore power.
| Check | How to Test | Expected Result | If It Fails | Done |
|---|---|---|---|---|
| Generator start | Start generator following onboard procedure. | Generator starts without alarm. | Check fuel, generator battery, seacock, panel breaker, base instructions. | |
| Generator cooling water | Look for water discharge. | Cooling water exits normally. | Stop generator if no water. Check seacock/strainer with base. | |
| AC output | Check AC panel after warm-up. | Panel shows stable 220–240V. | Check generator AC breaker and source selector. | |
| Battery charger on generator | Watch charger after AC is available. | Charger turns on and charges batteries. | Check charger breaker and AC selector. | |
| AC outlets | Test an outlet with a known device. | Outlet has power. | Check RCD, AC breaker, source selector. |
Shore Power and AC/DC Charger
When the boat is connected to shore power, the AC panel should show power and the charger should charge the batteries. If it does not, you may leave the marina with batteries already low.
Before disconnecting the shore cable, take a final look at the battery monitor and confirm which circuits will stay powered at anchor. If the panel layout is unfamiliar, review the basics of boat battery isolation so the crew does not accidentally turn off a critical circuit later in the trip.
| Check | How to Test | Expected Result | If It Fails | Done |
|---|---|---|---|---|
| Shore cable | Inspect connection at dock and boat. | Cable is secure and not damaged. | Do not use damaged shore cable. | |
| AC main breaker | Turn on main AC breaker/RCD as instructed. | AC panel receives power. | Check dock pedestal breaker and boat breaker. | |
| AC/DC charger | Check charger lights or battery monitor. | Charging is active. | Check charger breaker and AC source. | |
| Hot water | Switch on only if water heater is full and allowed. | Hot water heats on shore/generator power. | Check AC breaker and tank procedure. |
Windlass and Anchor System
The windlass should be tested before you need it. Do not discover a tripped breaker while drifting in a crowded anchorage.
A working windlass does not automatically mean the anchoring routine is safe. The skipper still needs to choose a suitable depth, lower enough chain, reverse gently to set the anchor and keep watch for dragging. For the full step-by-step method, use the guide on how to anchor a boat safely.
| Check | How to Test | Expected Result | If It Fails | Done |
|---|---|---|---|---|
| Windlass DOWN | Press DOWN on joystick or foot switch briefly. | Chain moves out smoothly. | Check windlass breaker, main DC fuse, battery voltage, remote connection. | |
| Windlass UP | Press UP briefly. | Chain comes in smoothly. | Check breaker/fuse first, then joystick/solenoid with base. | |
| Manual handle | Locate manual windlass handle. | Handle is onboard and fits. | Ask base for replacement before departure. | |
| Chain and shackle | Inspect anchor connection. | Shackle/pin secure, chain not twisted badly. | Report loose or missing seizing. |
For a full anchoring routine, read How to Anchor a Boat Safely.
Navigation Instruments
| Instrument | How to Test | Expected Result | If It Fails | Done |
|---|---|---|---|---|
| GPS / chartplotter | Power on and wait for satellite position. | Boat position appears correctly. | Check breaker, antenna, network, plotter source. | |
| Depth sounder | Compare reading with chart/marina depth. | Reading is realistic and stable. | Check instrument power and transducer setting. | |
| Wind instrument | Check speed/direction while wind is present. | Direction and speed look plausible. | Check masthead sensor, display source, network. | |
| Autopilot | Engage briefly only when safe. | Autopilot responds and can be disengaged. | Do not rely on it until tested underway. | |
| AIS | Check target display if installed. | Nearby AIS targets appear where expected. | Check VHF/AIS power, antenna, network. |
VHF Radio
The VHF radio is a safety system, not a decoration on the panel. Know how to power it on, change channel, adjust squelch, listen properly and make a short, clear call. If any of those steps feel uncertain, read Marine VHF Radio Basics before departure rather than trying to learn during an emergency.
| Check | How to Test | Expected Result | If It Fails | Done |
|---|---|---|---|---|
| Power | Switch VHF on. | Display turns on. | Check DC panel breaker and fuse. | |
| Receive | Set volume/squelch and monitor a working channel. | You hear traffic or static when squelch is open. | Check antenna and volume/squelch. | |
| Transmit | Perform a radio check only where appropriate. | Other station confirms clear reception. | Check antenna, microphone, power and channel. | |
| DSC/GPS position | Check DSC position if installed. | Radio shows valid GPS position. | Check GPS input/network before relying on DSC. |
Water Pressure, Toilets and Holding Tanks
| System | How to Test | Expected Result | If It Fails | Done |
|---|---|---|---|---|
| Fresh water pump | Open a tap briefly. | Pump starts and water flows. | Check pump breaker, tank selector, tank level. | |
| Shower drain | Run small amount of water and activate drain pump if needed. | Water drains properly. | Check drain pump switch/filter. | |
| Toilet flush | Test each toilet according to type. | Flush and discharge/holding tank function correctly. | Stop if blocked. Ask base before forcing pumps. | |
| Seacocks | Ask base to show relevant seacocks. | Open/closed positions are understood. | Do not force. Ask for demonstration. |
Refrigerator, Freezer and Air Conditioning
| System | How to Test | Expected Result | If It Fails | Done |
|---|---|---|---|---|
| Fridge | Switch on and wait for compressor/fan. | Compressor starts and box begins cooling. | Check DC breaker, thermostat, battery voltage. | |
| Freezer | Switch on and monitor temperature drop. | Cooling begins. | Check breaker, thermostat, AC/DC source. | |
| Air conditioning | Use shore power or generator, then start AC unit. | Unit starts, air cools, water discharge visible if seawater cooled. | Check AC breaker, seawater pump, strainer, generator load. |
Lights and Essential Safety Circuits
| Light / Circuit | How to Test | Expected Result | If It Fails | Done |
|---|---|---|---|---|
| Navigation lights | Switch on and visually confirm. | Port, starboard and stern lights work. | Check breaker, bulbs/LED, wiring. | |
| Anchor light | Switch on and check mast light if visible. | Anchor light works. | Check breaker and mast wiring. | |
| Cabin lights | Switch several lights on. | Lights work without flicker. | Check DC breaker and battery voltage. | |
| Deck light | Switch on if installed. | Deck illuminated. | Check breaker and fixture. |
Gas System and Galley
| Check | How to Test | Expected Result | If It Fails | Done |
|---|---|---|---|---|
| Gas bottle | Locate bottle and shutoff valve. | Valve location is understood. | Ask base to show it. | |
| Stove ignition | Light burner following correct procedure. | Flame is stable and shuts off correctly. | Stop if smell or flame problem appears. | |
| Gas shutoff habit | Turn off gas after test. | Gas is closed when not in use. | Make this part of crew briefing. |
Safety Equipment Functional Review
System checks and safety equipment checks belong together. A yacht with a working engine and instruments is still not ready to leave if life jackets, extinguishers, flares or emergency steering equipment are missing or inaccessible. Use this section together with the complete boat safety checklist.
| Equipment | Check | Expected Result | Done |
|---|---|---|---|
| Life jackets | Count and inspect sizes. | Enough for everyone, accessible. | |
| Fire extinguishers | Locate and check gauge if present. | Accessible and in service. | |
| First aid kit | Locate kit. | Accessible and stocked. | |
| Flares | Check location and expiry if required. | Accessible and valid. | |
| Emergency tiller | Locate and understand fitting point. | Onboard and usable. |
For broader emergency planning, read Emergency Procedures Croatia Yacht Charter.
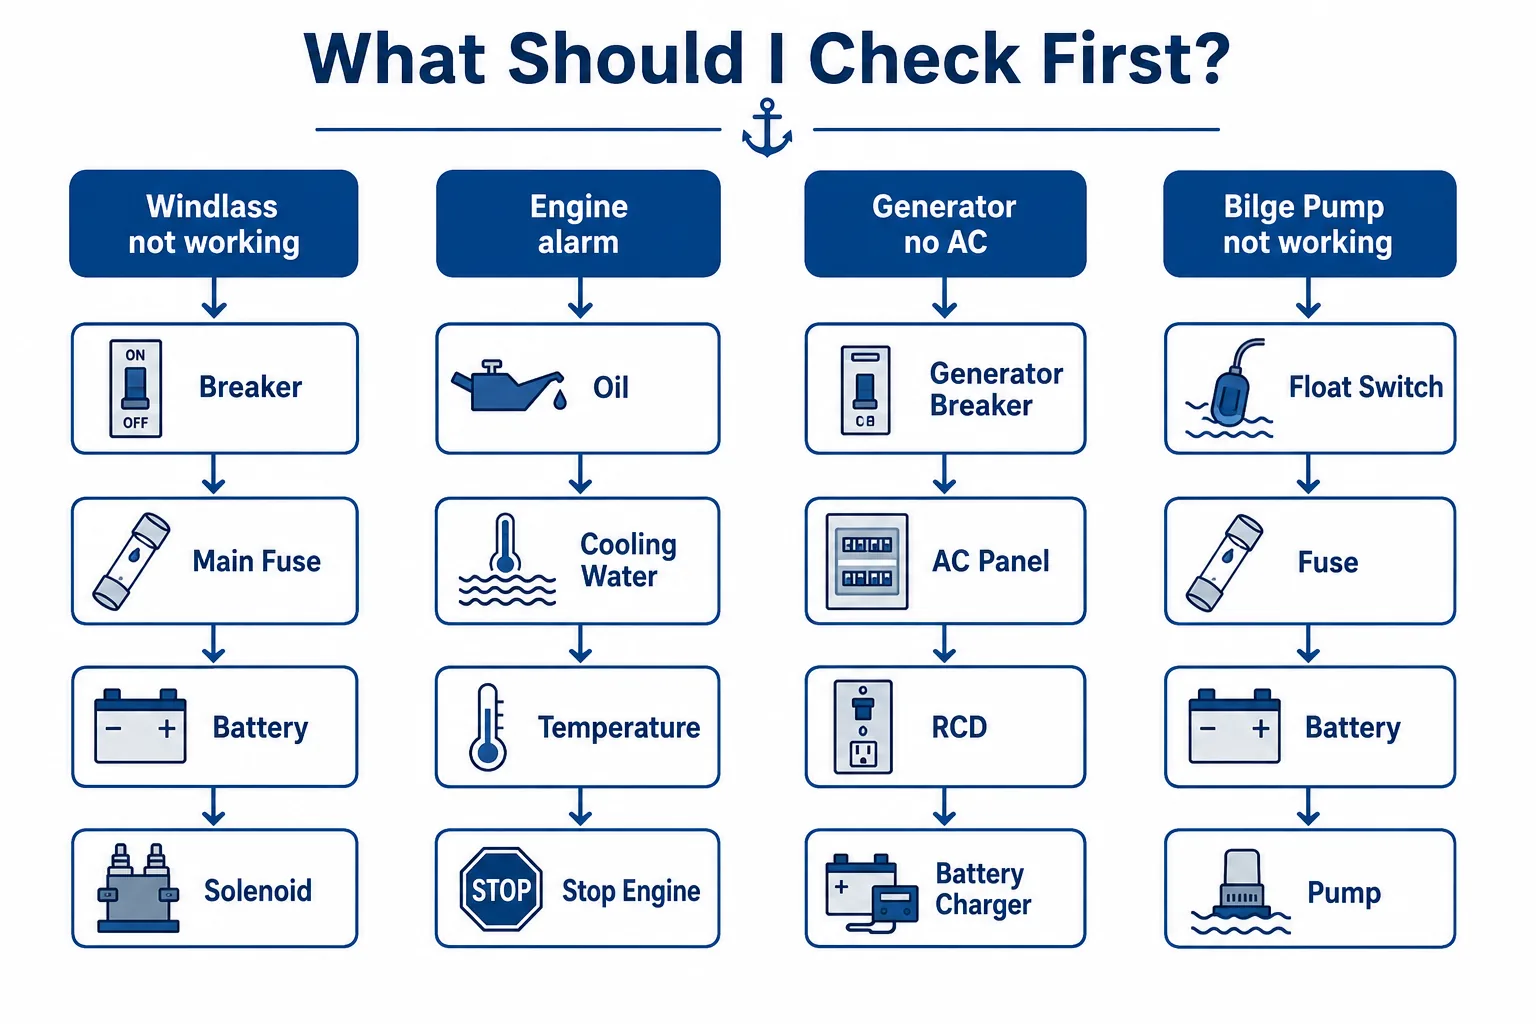
Troubleshooting: What to Check First
Windlass does not work
- Check windlass breaker.
- Check main DC fuse or high-current breaker.
- Check house/engine battery voltage depending on installation.
- Try both joystick and foot switch if available.
- Listen for solenoid click.
- Call base before relying on the anchor system.
Bilge pump does not start
- Check DC panel breaker.
- Check pump fuse.
- Lift float switch manually.
- Try manual panel switch.
- Check battery switch and voltage.
- Use manual bilge pump and report failure.
- If you need to understand the wiring path, compare the setup with the bilge pump connection guide.
Generator runs but no 220V on panel
- Let generator warm up briefly.
- Check generator AC output breaker.
- Check AC source selector.
- Check main AC breaker/RCD.
- Reduce load and try again.
- Report if no stable voltage appears.
Engine alarm remains on
- Do not ignore the alarm.
- Check oil pressure and temperature indicators.
- Check cooling water flow.
- Check oil level.
- Stop engine if alarm continues.
- Call base or mechanic.
GPS or depth sounder does not show data
- Check instrument breaker.
- Restart display.
- Check data source selection.
- Check network instruments if installed.
- Compare with backup navigation.
- Do not depart into unfamiliar shallow waters without reliable depth information.
Most experienced charter skippers complete every functional test while still connected to the dock. Resetting a breaker, replacing a missing handle, reporting a fault or asking the base to demonstrate a switch is simple in the marina, but much harder once the boat is already outside the harbour. This is why a calm technical check should be part of every bareboat departure routine.
When Not to Depart
| Problem | Departure Decision |
|---|---|
| No cooling water from engine | Do not depart. |
| Engine oil alarm remains active | Do not depart. |
| No reverse gear | Do not depart. |
| Bilge pump failure with water in bilge | Do not depart until solved. |
| Windlass not working and anchoring is planned | Do not depart without repair or clear alternative plan. |
| VHF radio not working | Do not depart for coastal sailing without suitable communication. |
| Depth sounder not working in shallow cruising area | Resolve before departure. |
| Strong weather warning | Review Beaufort conditions and delay if needed. |
Mini Quiz: Can You Test the Yacht Before Departure?
The quiz opens in a modal so it does not take over the article. Use it as a quick check for crew or skipper before handover.
Yacht Systems Test Quiz
Answer the questions and check your result. Missed answers will show the correct explanation.
Final Thoughts
This checklist is deliberately practical. It is not about memorising theory. It is about touching the switch, reading the panel, checking the sound, looking at the outlet, and knowing what “normal” looks like before you leave the dock.
A skipper who tests the bilge pump, engine, generator, windlass, VHF, GPS, depth sounder, water system and AC power before departure is not being difficult. They are doing the job properly.
Before a longer passage, also check the Boat Safety Checklist, review Sailing Weather Croatia, and make sure the crew understands the basics from the Bareboat Skippering Guide.
No checklist can remove every risk, but a skipper who understands VHF communication, safe anchoring, bilge pump testing and correct battery isolation starts the trip with fewer unknowns. That is the real purpose of this routine: not to make the handover longer, but to make the first day on the water calmer, safer and easier for everyone on board.
Continue reading
Build your Croatia sailing knowledge with related TwoBoat guides, software, guides and planning tools.